Introduction
Thoracentesis serves dual purposes, encompassing both diagnostic and therapeutic objectives. In its diagnostic capacity, thoracentesis plays a pivotal role in the analysis of pleural fluid. This analytical process is instrumental in distinguishing between exudate and transudate, shedding light on the underlying causes of pleural abnormalities.
Exudate, identified through thoracentesis, may indicate inflammatory or malignant conditions affecting the pleura. On the other hand, transudate may point towards disruptions in organ systems responsible for maintaining fluid balance within the body. The differentiation between these two types of pleural fluid facilitates a comprehensive understanding of the pathology at hand.
By discerning the nature of the pleural abnormality, thoracentesis aids healthcare professionals in pinpointing the root cause of the condition. This diagnostic precision is invaluable in guiding subsequent medical decisions and tailoring an appropriate treatment strategy for the patient. In essence, the diagnostic application of thoracentesis enhances the accuracy and effectiveness of patient care by providing critical insights into the etiology of pleural disorders.
Thoracentesis is a medical procedure involving the insertion of a needle or a catheter into the pleural space in the chest to remove excess fluid or air. This intervention is typically performed to relieve respiratory symptoms and assist in the diagnosis of underlying conditions affecting the pleura.
Indications:
- Pleural Effusion: To drain excessive fluid that has accumulated in the pleural cavity, causing compression of the lungs.
- Pneumothorax: To remove excess air that has entered the pleural space, leading to lung collapse.
- Diagnostic Purposes: To obtain a sample of pleural fluid for laboratory analysis, aiding in the identification of infections, malignancies, or other pleural diseases.
Thoracentesis Procedure
-
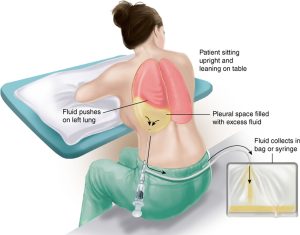
Patient Positioning:
- Place the patient in a sitting position with arms and head supported on a bedside table.
- Alternatively, if sitting is not feasible, the patient can lie on the affected side at the edge of the bed, with the ipsilateral arm over the head and the midaxillary line accessible.
- Elevate the head of the bed to 30 degrees if possible.
-
Needle Insertion Site:
- Identify the posterolateral aspect of the back over the diaphragm under the fluid level.
- Confirm the site by counting the ribs based on chest x-ray and percussing to determine the fluid level.
- Mark the top of dullness with washable ink or by indenting the skin.
-
Site Selection:
- Choose the thoracentesis site in an interspace below the point of dullness, either in the mid posterior line (posterior insertion) or midaxillary line (lateral insertion).
-
Sterile Technique:
- Adhere to sterile technique, including gloves, betadine prep, and draping.
-
Local Anesthesia:
- Anesthetize the skin over the insertion site with 1% lidocaine using a 5 cc syringe and a 25 or 27-gauge needle.
- Anesthetize the superior surface of the rib and the pleura.
- Insert the needle over the top of the rib (superior margin) to avoid intercostal nerves and blood vessels.
-
Needle Insertion:
- Insert the thoracentesis needle or angiocatheter to the depth marked during the initial aspiration.
- Maintain constant gentle suction on the syringe while advancing the needle over the top of the rib and through the pleura.
- Ensure avoidance of the neurovascular bundle located below the rib.
-
Fluid Aspiration:
- Attach the three-way stopcock and tubing and aspirate the required amount.
- Evacuate the fluid through the tubing.
-
Fluid Removal Limits:
- Do not remove more than 1500 mL of fluid at any one time due to the increased risk of pleural edema or hypotension.
- Avoid complete drainage of an effusion to minimize the risk of pneumothorax from needle laceration of the visceral pleura.
-
Completion:
- When fluid drainage is complete, instruct the patient to take a deep breath and hum before gently removing the needle.
- Cover the insertion site with a sterile occlusive dressing.
This comprehensive thoracentesis procedure ensures proper patient positioning, site selection, and adherence to aseptic techniques for a safe and effective process.
Read more: Central Venous Pressure