Thoracentesis also known as pleural tap is a sterile bedside procedure that removes fluid or air from the pleural space using a needle or catheter. Clinically, thoracentesis supports two goals: diagnostic clarification and therapeutic relief. Diagnostic sampling enables pleural fluid analysis that distinguishes exudate from transudate, guiding evaluation for malignancy, infection, heart failure, hepatic hydrothorax, pancreatitis, chylothorax, and more.
Therapeutic drainage reduces dyspnea by relieving lung compression from pleural effusion or, in selected cases, helps evacuate symptomatic pneumothorax via aspiration under expert direction. Safe practice relies on meticulous asepsis, ultrasound guidance for site selection, careful volume control to reduce re-expansion pulmonary edema, vigilant monitoring for complications, and thorough documentation. The following education-focused guide consolidates practical technique, nursing interventions, pleural fluid interpretation, and safety pearls for high-quality care.
Thoracentesis Procedure: Indications, Ultrasound-Guided Technique, Nursing Care, Risks, and Documentation
What Thoracentesis Is and Why It Matters
Thoracentesis involves percutaneous pleural access using a needle, catheter-over-needle, or small-bore drainage catheter to aspirate fluid or air. Bedside ultrasound has transformed safety and success by mapping fluid pockets, marking optimal interspaces, and visualizing lung sliding and diaphragmatic position.
Diagnostic value
- Confirms pleural fluid etiology through Light’s criteria and extended testing.
- Identifies infection (complicated parapneumonic effusion or empyema), malignancy, chylothorax, hemothorax, and other conditions.
- Directs next steps: antibiotics, intrapleural therapy, chest tube, pleurodesis, oncologic evaluation, or specialty referral.
Therapeutic value
- Reduces dyspnea from large effusions by re-expanding compressed lung tissue.
- Provides symptom relief during cancer care or advanced organ failure.
- Facilitates ventilatory mechanics in ICU settings when effusions impair ventilation.
Indications and Clinical Objectives
Common indications
- Pleural effusion of unknown cause requiring diagnostic sampling.
- Large, symptomatic effusion causing respiratory compromise.
- Suspected empyema or complicated parapneumonic effusion requiring fluid analysis and potential drainage.
- Malignant effusion for symptom relief, staging, and cytology.
- Hemothorax assessment in stable trauma or postoperative settings (under protocol).
- Selected primary spontaneous pneumothorax cases for aspiration by experienced teams.
Clinical objectives
- Determine transudate vs exudate with Light’s criteria.
- Identify organisms, malignant cells, chyle, blood, or inflammatory profiles.
- Reduce dyspnea, improve oxygenation, and optimize lung mechanics.
- Measure and trend pleural pressures when pleural manometry is available.
Contraindications and Precautions
Absolute contraindications (rare but important)
- Uncooperative patient unable to maintain position despite support, creating unacceptable procedural risk.
- Local skin infection overlying insertion site without an alternative safe site.
Relative contraindications and mitigation
- Coagulopathy or thrombocytopenia: correctable deficits per policy and risk-benefit assessment; ultrasound guidance favored.
- Small or loculated collections adjacent to vital structures: demand expert ultrasound use.
- Mechanical ventilation with high PEEP: increased risk of pneumothorax; optimize ventilator settings in collaboration with critical care.
- Anticoagulant/antiplatelet therapy: periprocedural management follows prescriber orders and institutional policy; do not generalize beyond local guidance.
- Post-pneumonectomy side: contraindicated; confirm surgical history before planning.
Anatomy, Landmarks, and Ultrasound Guidance
Relevant anatomy
- Pleural space: potential space between visceral and parietal pleura.
- Intercostal neurovascular bundle: runs along the inferior margin of each rib; safe needle path tracks over the superior rib margin.
- Diaphragm and subdiaphragmatic organs (liver, spleen): ultrasound reduces risk of organ injury by delineating diaphragmatic position.
Advantages of ultrasound guidance
- Improves first-pass success and reduces pneumothorax and organ injury.
- Identifies safe pocket depth, loculations, septations, and lung consolidation.
- Enables dynamic confirmation of needle trajectory and pleural entry.
- Supports site marking for sterile preparation.
Pre-Procedure Assessment and Preparation
Assessment checklist
- Confirm indication, goals (diagnostic, therapeutic, or both), and consent.
- Review imaging (ultrasound preferred; recent chest radiograph or CT helpful).
- Screen for anticoagulants/antiplatelets; follow policy and prescriber orders.
- Baseline evaluation: vital signs, work of breathing, oxygen requirement.
- Lab considerations per protocol: CBC, coagulation profile when indicated.
- Evaluate for loculations, minimal fluid depth (<1–2 cm), or post-pneumonectomy status.
Equipment and supplies
- Ultrasound machine with linear or curvilinear probe; sterile probe cover and gel.
- Sterile procedural kit: skin prep (chlorhexidine), fenestrated drape, sterile gloves, mask, cap, gown.
- Local anesthetic (e.g., 1% lidocaine), syringes (5–10 mL), needles (25–27 g for skin wheal; longer for deeper anesthesia).
- Thoracentesis needle or catheter-over-needle system; optional small-bore pleural catheter for prolonged drainage.
- Three-way stopcock, extension tubing, vacuum bottle or collection system.
- Specimen tubes: EDTA (cell count/diff), heparin or sterile tubes (chemistry, LDH, glucose, protein), culture bottles, cytology container, triglycerides/cholesterol, pH syringe with anaerobic technique.
- Occlusive dressing, adhesive securement, labels for time, site, and volume.
- Supplemental oxygen, pulse oximeter, and monitoring equipment.
- Sharps container and waste supplies.
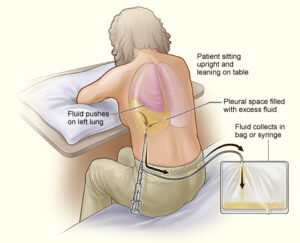
Patient positioning and comfort
- Preferred: seated, leaning slightly forward with arms supported on a bedside table; scapulae abducted to open interspaces.
- Alternate: lateral decubitus with affected side up; head of bed 30–45 degrees when seated posture not possible.
- Provide warm blankets and calm communication to reduce anxiety and movement.
- Explain that brief cough or pressure sensations can occur as fluid shifts; reinforce stillness and steady breathing.
Step-by-Step Thoracentesis Procedure (Ultrasound-Guided)
1) Site selection and marking
- Use ultrasound to identify a fluid pocket at least several centimeters deep, away from diaphragm and solid organs.
- Select an interspace one or two levels below the top of dullness, mid-scapular or posterior axillary line; avoid interspace below the ninth rib posteriorly due to diaphragmatic excursion.
- Mark the site on cleansed skin; note depth and trajectory.
2) Sterile prep and draping
- Perform wide chlorhexidine prep; allow full dry time.
- Drape a large sterile field; maintain strict asepsis during setup and access.
3) Local anesthesia
- Raise a skin wheal with 1% lidocaine using a small-gauge needle.
- Advance a longer needle along the intended path, aspirating intermittently to avoid vascular puncture.
- Anesthetize periosteum of the superior rib margin and parietal pleura; incremental administration reduces discomfort.
4) Needle or catheter insertion
- Insert over the superior edge of the rib to protect the neurovascular bundle.
- Advance slowly while applying gentle negative pressure on the syringe until pleural fluid is aspirated.
- Confirm pleural entry and, if using catheter-over-needle, advance the catheter into the pleural space while withdrawing the needle.
5) Controlled fluid aspiration
- Attach extension tubing with a three-way stopcock to a collection system.
- For diagnostic taps, collect adequate volume for all requested studies (often 30–60 mL total across tubes).
- For therapeutic drainage, remove fluid slowly with continuous patient assessment. Many programs target up to 1–1.5 L per session to reduce risk of re-expansion pulmonary edema; pleural manometry, when available, guides safe limits (avoid more negative than approximately −20 cmH2O).
6) Completion and hemostasis
- Clamp tubing; remove needle/catheter in a smooth motion.
- Apply gentle pressure; cover with an occlusive sterile dressing.
- Dispose of sharps immediately and secure specimens with correct labeling.
7) Immediate post-procedure care
- Observe vital signs, work of breathing, and pulse oximetry.
- Monitor for chest pain, cough, dyspnea, hypotension, vasovagal symptoms, or persistent fluid leak.
- Post-procedure imaging policies vary; point-of-care ultrasound or chest radiograph may be obtained based on clinical status and institutional standards.
Pleural Fluid Analysis: Interpreting Diagnostic Results
Classifying transudate vs exudate (Light’s criteria)
An exudate is likely when any of the following are true:
- Pleural fluid protein / serum protein > 0.5
- Pleural fluid LDH / serum LDH > 0.6
- Pleural fluid LDH > two-thirds the upper limit of normal for serum LDH
Transudates often reflect systemic fluid shifts (e.g., heart failure, cirrhosis, nephrotic syndrome). Exudates suggest local pleural disease or inflammation (e.g., pneumonia, malignancy, pancreatitis, PE).
H3: Additional diagnostic tests
- Cell count and differential: neutrophil predominance often indicates acute inflammation; lymphocyte predominance common in malignancy or tuberculosis.
- pH and glucose: low values suggest complicated parapneumonic effusion or malignancy; very low pH (<7.20) often warrants chest tube drainage.
- Gram stain and culture: identify bacterial pathogens.
- Cytology: detect malignant cells; sensitivity increases with larger sample volumes and repeat sampling.
- Triglycerides and cholesterol: elevated triglycerides support chylothorax; cholesterol measures help identify pseudochylothorax.
- ADA (adenosine deaminase): supportive for tuberculous pleuritis in appropriate epidemiologic settings.
- Amylase: elevated in pancreatitis-related effusion or esophageal rupture.
Nursing Considerations and Interventions
Before the procedure
- Verify provider order, indication, and consent.
- Confirm identity using two identifiers.
- Review anticoagulant status and lab results per policy.
- Explain procedure steps, expected sensations, and safety measures in clear language.
- Remove clothing or jewelry obstructing access; clip excessive hair if needed.
- Establish baseline vital signs and oxygen saturation.
- Prepare monitoring equipment and supplemental oxygen.
- Ensure resuscitation supplies remain accessible.
During the procedure
- Assist with positioning; maintain comfort while ensuring access.
- Provide calm, stepwise coaching to support stillness and normal breathing.
- Monitor vital signs, oxygen saturation, and overall tolerance.
- Administer supplemental oxygen per order.
- Observe for early signs of distress: pallor, diaphoresis, cough, dyspnea, chest pain, hypotension, or lightheadedness.
- Track total volume removed and pace of drainage.
After the procedure
- Maintain frequent vital signs and pulse oximetry checks during initial observation period.
- Assess breath sounds, symmetry of chest expansion, and work of breathing.
- Inspect puncture site for bleeding, hematoma, subcutaneous emphysema, or persistent leak.
- Positioning: many protocols favor comfort-based positioning with head elevation; some recommend lying on the unaffected side for a short interval after lateral decubitus procedures.
- Arrange specimen transport; ensure accurate labeling and chain of custody for cytology and culture.
- Provide patient-facing education covering warning signs and follow-up plans (language at appropriate health literacy levels).
- Document all elements thoroughly (see documentation section).
Complications: Recognition, Prevention, and Initial Management
Pneumothorax
- Description: air entry into pleural space from lung or chest wall injury; risk increases with deep interspaces, absence of ultrasound, or mechanical ventilation.
- Prevention: routine ultrasound guidance; careful technique; minimize sudden patient movement; avoid excessive negative pressure during aspiration.
- Signs: pleuritic pain, dyspnea, decreased breath sounds, hypoxemia; ultrasound may show absent lung sliding; radiograph confirms.
- Immediate actions: oxygen, clinical reassessment, imaging per policy; chest tube insertion if clinically significant.
Re-expansion pulmonary edema (REPE)
- Description: noncardiogenic edema occurring after rapid re-expansion of a chronically collapsed lung; rare but potentially severe.
- Prevention: avoid rapid, high-volume drainage; consider manometry; stop or slow when chest discomfort or persistent cough emerges.
- Signs: cough, pleuritic pain, hypoxemia after drainage; new infiltrates on imaging.
- Management: supportive oxygen, noninvasive ventilation when indicated, careful hemodynamic monitoring.
Bleeding and hemothorax
- Description: intercostal vessel or organ injury causing bleeding; rare with ultrasound guidance.
- Prevention: use superior rib margin; meticulous ultrasound mapping; correct coagulopathy when feasible per policy.
- Signs: local swelling, hematoma, hypotension, bloody output; imaging and labs assist evaluation.
- Management: direct pressure, escalation to procedural or surgical teams, transfusion per protocol if needed.
Infection (cellulitis, empyema)
- Prevention: strict asepsis, chlorhexidine prep, sterile draping, and minimal breaks in technique.
- Signs: fever, localized erythema, warmth, pain, drainage.
- Management: culture, antibiotics per prescriber, drainage for empyema as indicated.
Vasovagal reaction
- Signs: pallor, bradycardia, hypotension, nausea.
- Management: stop drainage, recline with legs elevated, maintain airway; resume only when stable.
Organ injury (liver, spleen, diaphragm) and other events
- Prevention: precise ultrasound localization; avoid low interspaces posteriorly; approach lateral or posterior-axillary lines thoughtfully.
- Cough or pain: slow drainage; pause until symptoms settle.
- Persistent site leak: occlusive dressing with adequate seal; re-evaluate if ongoing.
Special Populations and Situational Considerations
Mechanical ventilation
- Positive pressure ventilation increases risk of pneumothorax; ultrasound and careful coordination with ventilator settings are essential.
- PEEP adjustments may be considered per critical care guidance during access.
Coagulopathy and thrombocytopenia
- Ultrasound-guided thoracentesis has low bleeding risk even with mild to moderate abnormalities; significant defects require individualized plans under prescriber direction.
Pediatric thoracentesis
- Smaller interspaces and thinner chest wall anatomy require pediatric expertise and appropriately sized equipment.
- Sedation policies vary; child life and distraction techniques improve tolerance.
Pregnancy
- Diaphragm elevation alters landmarks; ultrasound mapping is crucial.
- Positioning considers maternal hemodynamics and fetal monitoring when indicated.
Loculated effusions and empyema
- Multiloculated collections may require image-guided catheter placement or surgical intervention rather than simple thoracentesis.
Volume Limits, Pleural Manometry, and Safety Pearls
Volume removal
- Many programs limit removal to 1–1.5 L in a single session without manometry; symptom-led pauses and slower rates help mitigate risk.
- Larger volumes can be drained when pleural pressures do not fall beyond approximately −20 cmH2O and symptoms remain stable, under experienced supervision.
Pleural manometry
- Direct pressure measurements inform safe withdrawal and recognize non-expandable lung.
- Rising negative pressure or significant chest discomfort prompts slower drainage or early termination.
Practical pearls
- Always pass above the rib to protect the neurovascular bundle.
- Reconfirm the site after any position change.
- Label all specimens immediately with site, date, and required tests.
- Track cumulative fluid removal for serial procedures, especially in oncology and palliative care.
Thoracentesis vs Chest Tube (Tube Thoracostomy)
Thoracentesis
- Best for diagnostic sampling and limited therapeutic drainage of free-flowing effusions.
- Short-duration access; small needle or catheter; typically single session.
Chest tube
- Indicated for continuous drainage: empyema, hemothorax, large pneumothorax, or recurrent malignant effusion (with pleurodesis).
- Requires a larger-bore catheter, securement, and prolonged management with suction or water seal.
Nursing Workflow: Checklists for Safe, Efficient Care
Pre-procedure checklist
- Order, consent, identity verification
- Imaging review and ultrasound plan
- Anticoagulant status and lab review per policy
- Equipment and specimen tubes prepared and labeled
- Baseline vitals and oxygen set up
- Patient positioning and education completed
Intra-procedure checklist
- Sterile prep and draping complete
- Local anesthesia administered
- Ultrasound confirmation before entry
- Needle/catheter over superior rib margin
- Controlled aspiration with volume tracking
- Continuous monitoring and supportive coaching
Post-procedure checklist
- Dressing applied; site hemostasis confirmed
- Vitals and oxygenation monitored at protocol intervals
- Site assessed for bleeding, subcutaneous emphysema, or leak
- Specimens transported promptly with correct chain of custody
- Imaging arranged when indicated
- Documentation completed; handoff given with key findings and next steps
Documentation Essentials
Required elements
- Indication(s) and diagnostic/therapeutic intent
- Site and side, patient position, ultrasound guidance use
- Asepsis details, anesthesia agents/amounts
- Needle or catheter type/size; number of attempts
- Volume removed and character (e.g., serous, serosanguinous, chylous, purulent)
- Specimens sent: tests requested and containers used
- Immediate tolerance and complications, if any
- Post-procedure assessment and imaging results when obtained
- Education provided and follow-up plan
Sample documentation line (abbreviated)
“Ultrasound-guided thoracentesis performed at left posterior-axillary line, 7th interspace. Sterile technique with chlorhexidine and full drape. 1% lidocaine 8 mL for local anesthesia. Catheter-over-needle technique used; 950 mL straw-colored fluid removed over 20 minutes. No immediate complications; oxygen saturation remained ≥95% on 2 L nasal cannula. Occlusive dressing applied. Pleural fluid sent for cell count/diff, protein, LDH, glucose, pH, Gram stain/culture, cytology. Post-procedure ultrasound showed lung sliding. Patient comfortable; vital signs stable. Results pending.”
Education for Patients and Families
Teaching points
- Purpose of the procedure (diagnostic, therapeutic, or both)
- Steps taken to support comfort and safety, including ultrasound guidance and local anesthesia
- Expected sensations during drainage (pressure, cough) and typical timeframes
- Importance of reporting chest pain, dyspnea, dizziness, or persistent cough promptly
- Post-procedure site care and monitoring plan
- Follow-up timing for results review and next steps
Quality, Safety, and Evidence-Informed Practice
Evidence-aligned principles
- Ultrasound guidance reduces complications and improves first-pass success.
- Controlled drainage volumes and manometry decrease re-expansion injury risk.
- Early detection of empyema with low pH/low glucose profiles supports timely chest tube placement and intrapleural therapy.
- Standardized checklists and bundles improve safety and documentation quality.
Unit-level metrics
- Procedure success rate and complication rate (pneumothorax, bleeding, infection)
- Rate of ultrasound-guided versus landmark-only procedures
- Timeliness of pleural fluid transport and result turnaround
- Comprehensive documentation adherence and post-procedure follow-up compliance
Thoracentesis Procedure: Quick Reference Summary
- Indications: undiagnosed effusion, symptomatic large effusion, suspected empyema, malignant effusion, selected pneumothorax.
- Best practice: ultrasound-guided site selection; pass above rib; aspirate slowly; consider manometry.
- Safety limits: commonly up to 1–1.5 L without manometry; stop for pain, persistent cough, hypotension, or O2 drop.
- Diagnostics: Light’s criteria, pH, glucose, LDH, protein, cell count/diff, Gram stain/culture, cytology, triglycerides, ADA, amylase as indicated.
- Post-care: monitor vitals, oxygenation, site; arrange imaging when indicated; document completely.
FAQs: Thoracentesis Procedure
How long does a thoracentesis take?
Most bedside thoracentesis procedures are completed in about 10–30 minutes once setup is finalized. Total time varies with positioning needs, ultrasound mapping, and volume removed.
Is thoracentesis painful?
Local anesthetic minimizes pain. Most individuals report pressure or a transient urge to cough as fluid shifts. Ongoing pain, sharp chest discomfort, or significant dyspnea warrants immediate reassessment.
How much fluid can be removed safely?
Many programs limit drainage to approximately 1–1.5 liters per session in the absence of manometry. Larger volumes may be considered under experienced supervision when pleural pressures and symptoms remain acceptable.
When is a chest X‑ray required after thoracentesis?
Imaging practices vary. Some teams use bedside ultrasound to confirm lung sliding and screen for pneumothorax, reserving radiography for symptoms or high-risk scenarios. Follow local policy.
What tests are commonly performed on pleural fluid?
Typical panels include protein, LDH, glucose, pH, cell count/differential, Gram stain/culture, and cytology. Additional tests—triglycerides, ADA, amylase—are ordered selectively based on suspected causes.
Conclusion
Thoracentesis merges diagnostic precision with therapeutic relief when pleural effusion or selected pneumothorax limits pulmonary function. High-value practice integrates ultrasound guidance, thoughtful positioning, local anesthesia, controlled drainage volumes, and vigilant monitoring. Consistent nursing workflows preparation, sterile technique, real-time assessment, and thorough documentation elevate safety and outcomes.
As part of an interprofessional plan, pleural fluid analysis shapes definitive management while therapeutic drainage restores comfort and respiratory mechanics. Teams that apply evidence-informed technique and unit-level quality measures deliver safer procedures and better results across care settings.
Educational and Policy Note
This content provides professional education and does not replace institutional policy, prescriber orders, or specialist guidance. Clinical decisions should follow local protocols, credentialing standards, and current evidence-based guidelines.