vaginal irrigation

Introduction

Vaginal irrigation, commonly known as a douche, is a procedure used to cleanse the vaginal area. It is important to note that routine douching is generally not recommended, as the vagina is self-cleaning and frequent douching can disrupt its natural balance. However, in certain medical situations, a healthcare provider may prescribe or recommend a vaginal douche for therapeutic purposes.

Purpose:

  • To cleanse and disinfect the vaginal area.
  • To provide relief from specific medical conditions, such as infections or inflammation.

Equipment:

  • Douche kit or bag.
  • Sterile or prescribed solution (e.g., saline solution, antiseptic solution).
  • Towels or disposable pads.
  • Privacy drapes or curtains.

Procedure:

  1. Preparation:
    • Wash hands thoroughly and gather all necessary equipment.
    • Ensure privacy and explain the procedure to the patient, addressing any concerns or questions.
  2. Positioning:
    • Assist the patient into a comfortable position, typically in a supine position with knees bent.
  3. Preparation of Solution:
    • Prepare the prescribed or recommended solution according to healthcare provider instructions.
  4. Setup Douche Kit:
    • Assemble the douche kit or bag, ensuring proper connection to the solution container.
  5. Insertion:
    • Gently insert the nozzle or tubing into the vagina. The insertion should be slow and careful to avoid discomfort or injury.
  6. Administration:
    • Allow the solution to flow into the vaginal area at a slow and controlled rate. The patient should communicate any discomfort or pain.
  7. Drainage:
    • Once the recommended amount of solution has been administered, allow the patient to drain the solution from the vagina into a basin or toilet.
  8. Assist and Support:
    • Assist the patient as needed and provide support during the process. Address any concerns or discomfort promptly.
  9. Observation:
    • Observe for any signs of adverse reactions or complications, such as increased discomfort, bleeding, or allergic reactions.
  10. Post-Procedure:
    • Discard used equipment appropriately.
    • Provide post-douching care instructions as per healthcare provider recommendations.

Note:

  • Healthcare providers should carefully consider the necessity of vaginal irrigation and provide clear instructions to patients.
  • Douching is generally discouraged in routine hygiene practices, as it may disrupt the natural flora of the vagina and lead to complications.

Always follow healthcare provider instructions and adhere to established protocols when performing vaginal irrigation.


Read more

Last offices procedure

Introduction Providing respectful and compassionate care to the deceased is an important aspect of nursing practice. Here are some considerations for nursing care of the deceased: Communication and Sensitivity: Communicate with empathy and sensitivity to the family or significant others. Use clear and compassionate language to explain the situation. Be responsive to cultural and religious … Read more

Thoracentesis Procedure

Introduction

Thoracentesis serves dual purposes, encompassing both diagnostic and therapeutic objectives. In its diagnostic capacity, thoracentesis plays a pivotal role in the analysis of pleural fluid. This analytical process is instrumental in distinguishing between exudate and transudate, shedding light on the underlying causes of pleural abnormalities.

Exudate, identified through thoracentesis, may indicate inflammatory or malignant conditions affecting the pleura. On the other hand, transudate may point towards disruptions in organ systems responsible for maintaining fluid balance within the body. The differentiation between these two types of pleural fluid facilitates a comprehensive understanding of the pathology at hand.

By discerning the nature of the pleural abnormality, thoracentesis aids healthcare professionals in pinpointing the root cause of the condition. This diagnostic precision is invaluable in guiding subsequent medical decisions and tailoring an appropriate treatment strategy for the patient. In essence, the diagnostic application of thoracentesis enhances the accuracy and effectiveness of patient care by providing critical insights into the etiology of pleural disorders.

Thoracentesis is a medical procedure involving the insertion of a needle or a catheter into the pleural space in the chest to remove excess fluid or air. This intervention is typically performed to relieve respiratory symptoms and assist in the diagnosis of underlying conditions affecting the pleura.

Indications:

  1. Pleural Effusion: To drain excessive fluid that has accumulated in the pleural cavity, causing compression of the lungs.
  2. Pneumothorax: To remove excess air that has entered the pleural space, leading to lung collapse.
  3. Diagnostic Purposes: To obtain a sample of pleural fluid for laboratory analysis, aiding in the identification of infections, malignancies, or other pleural diseases.

Thoracentesis Procedure

  1. Patient Positioning:

    • Place the patient in a sitting position with arms and head supported on a bedside table.
    • Alternatively, if sitting is not feasible, the patient can lie on the affected side at the edge of the bed, with the ipsilateral arm over the head and the midaxillary line accessible.
    • Elevate the head of the bed to 30 degrees if possible.
  2. Needle Insertion Site:

    • Identify the posterolateral aspect of the back over the diaphragm under the fluid level.
    • Confirm the site by counting the ribs based on chest x-ray and percussing to determine the fluid level.
    • Mark the top of dullness with washable ink or by indenting the skin.
  3. Site Selection:

    • Choose the thoracentesis site in an interspace below the point of dullness, either in the mid posterior line (posterior insertion) or midaxillary line (lateral insertion).
  4. Sterile Technique:

    • Adhere to sterile technique, including gloves, betadine prep, and draping.
  5. Local Anesthesia:

    • Anesthetize the skin over the insertion site with 1% lidocaine using a 5 cc syringe and a 25 or 27-gauge needle.
    • Anesthetize the superior surface of the rib and the pleura.
    • Insert the needle over the top of the rib (superior margin) to avoid intercostal nerves and blood vessels.
  6. Needle Insertion:

    • Insert the thoracentesis needle or angiocatheter to the depth marked during the initial aspiration.
    • Maintain constant gentle suction on the syringe while advancing the needle over the top of the rib and through the pleura.
    • Ensure avoidance of the neurovascular bundle located below the rib.
  7. Fluid Aspiration:

    • Attach the three-way stopcock and tubing and aspirate the required amount.
    • Evacuate the fluid through the tubing.
  8. Fluid Removal Limits:

    • Do not remove more than 1500 mL of fluid at any one time due to the increased risk of pleural edema or hypotension.
    • Avoid complete drainage of an effusion to minimize the risk of pneumothorax from needle laceration of the visceral pleura.
  9. Completion:

    • When fluid drainage is complete, instruct the patient to take a deep breath and hum before gently removing the needle.
    • Cover the insertion site with a sterile occlusive dressing.

This comprehensive thoracentesis procedure ensures proper patient positioning, site selection, and adherence to aseptic techniques for a safe and effective process.

Thoracentesis Nursing Considerations

Before the Procedure:

  1. Verify the doctor’s order.
  2. Confirm the patient’s identity.
  3. Have the patient sign a consent form after explaining the procedure thoroughly.
  4. Emphasize the procedure’s importance and mention the likelihood of mild pain at the needle insertion site.
  5. Inform the patient that the procedure is brief, depending on the time required for fluid drainage from the pleural cavity.
  6. Advise against coughing during needle insertion to prevent lung puncture.
  7. Explain the timing, location, and individuals present during the procedure.
  8. Reinforce the physician’s explanations about potential diagnostic procedures and sedative use.
  9. Request the removal of clothing, jewelry, or items that may interfere with the procedure.
  10. Shave the area around the puncture site if necessary.
  11. Monitor vital signs before the procedure.

During the Procedure:

  1. Provide verbal support and describe procedure steps when needed.
  2. Monitor vital signs throughout the procedure.
  3. Administer supplemental oxygen if required through a mask or nasal cannula.
  4. Observe for signs of distress such as dyspnea, pallor, or coughing.
  5. Position the patient sitting with raised arms on an overbed table or in a side-lying position if sitting is not feasible.
  6. Cleanse the puncture site with antiseptic solution.
  7. Administer a local anesthetic at the thoracentesis site.
  8. Limit fluid removal to no more than 1000 mL within the first 30 minutes.
  9. Apply a small sterile dressing over the puncture site.

After the Procedure:

  1. Monitor changes in cough, sputum, respiratory depth, breath sounds, and chest pain.
  2. Position the client appropriately; some protocols recommend lying on the unaffected side with an elevated head for at least 30 minutes.
  3. Place the patient in a side-lying position with the unaffected side down for an extended period if necessary.
  4. Document the procedure details, including date, time, primary care provider’s name, amount and characteristics of drained fluid, and nursing assessments/interventions.
  5. Transport specimens to the laboratory.
  6. Monitor the puncture site dressing for bleeding or drainage.
  7. Continue monitoring blood pressure, pulse, and breathing until stable.
  8. Document all relevant information comprehensively.

Potential Nursing Diagnoses:

  1. Impaired Gas Exchange:
    • Related to decreased lung expansion secondary to pleural effusion.
  2. Acute Pain:
    • Related to the invasive nature of the thoracentesis procedure, evidenced by patient reports of discomfort or pain at the puncture site.
  3. Anxiety:
    • Related to the anticipation of the thoracentesis procedure, fear of potential complications, or uncertainty about the outcome.
  4. Deficient Knowledge:
    • Related to lack of information regarding the purpose, procedure, and expected outcomes of thoracentesis.
  5. Risk for Infection:
    • Related to the invasive nature of the procedure and compromised integrity of the skin at the puncture site.
  6. Ineffective Breathing Pattern:
    • Related to the accumulation of pleural fluid restricting lung expansion.
  7. Risk for Hypotension:
    • Related to the potential rapid removal of large volumes of pleural fluid during thoracentesis.
  8. Risk for Pneumothorax:
    • Related to the invasive nature of the procedure and the potential for lung injury during needle insertion.
  9. Disturbed Body Image:
    • Related to alterations in physical appearance due to the thoracentesis procedure or associated conditions.
  10. Ineffective Coping:
    • Related to stressors associated with the thoracentesis procedure, potential discomfort, or uncertainty about the outcome.

These nursing diagnoses provide a basis for identifying and addressing the patient’s needs before, during, and after the thoracentesis procedure. Individual patient assessments will help determine the most appropriate nursing diagnoses and interventions.


Read more

Central Venous Pressure

Introduction

Description: Central venous pressure (CVP) refers to the pressure of blood in the thoracic vena cava, near the right atrium of the heart. CVP provides insights into the amount of blood returning to the heart and the heart’s ability to pump blood into the arterial system.

Objectives:

  1. Serve as a guide for fluid replacement in seriously ill patients.
  2. Estimate blood volume deficits.
  3. Determine pressures in the right atrium and central veins.
  4. Evaluate for circulatory failure within the total clinical picture of a patient.

Indications: Patients with cardiovascular disorders.

Nursing Alert: CVP readings should not be relied upon alone; they must be used in conjunction with other assessment data. Any abnormal findings should be promptly reported to the doctor.

Equipment:

  1. Venous pressure tray
  2. Cut-down tray
  3. Infusion solution and infusion set
  4. 3-way or 4-way stopcock (pressure transducer may also be used)
  5. IV pole attached to bed
  6. Arms board
  7. Adhesive tape
  8. ECG monitor
  9. Carpenter’s level (for establishing zero point)

Nursing Interventions:

  1. Assemble equipment according to manufacturer’s directions.
  2. Explain that the procedure is similar to an IV, and the patient may move in bed as desired after the passage of the CVP catheter.
  3. Place the patient in a comfortable position as a baseline for subsequent readings. Serial CVP readings should be consistent in terms of patient position to avoid inaccuracies.
  4. Attach the manometer to the IV pole, ensuring the zero point aligns with the patient’s right atrium, located at the midaxillary line, about 1/3 of the distance from the anterior to the posterior chest wall.
  5. Mark the midaxillary line on the patient as an external reference point for the manometer’s zero level.
  6. Connect the CVP catheter to a 3-way stopcock or transducer for monitoring.
  7. Start the IV flow, filling the manometer 10 cm above the anticipated reading.
  8. Surgically cleanse the CVP site, and insert the catheter through an antecubital, subclavian, or internal/external jugular vein into the superior vena cava, confirming placement via fluoroscopy or chest x-ray.
  9. Observe for respiratory fluctuations as the catheter enters the thorax, and monitor the patient’s ECG during insertion.
  10. Suture and tape the catheter in place, apply a sterile dressing, and label it with the time and date of insertion.
  11. Adjust the infusion rate to prevent a rapid increase in venous pressure.

Measuring Central Venous Pressure:

  1. Place the patient in the identified position and confirm the zero point at the level of the right atrium.
  2. Position the zero point of the manometer at the level of the right atrium, ensuring consistency in measurements.
  3. Turn the stopcock to fill the manometer, observe the fall in fluid height, and record the stabilized level as the central venous pressure (CVP). CVP may range from 5-12 cm H2O.
  4. Assess the patient’s clinical condition, interpreting CVP readings within the context of the entire clinical picture. Frequent changes in measurements will guide the detection of fluid load handling by the heart and the presence of hypovolemia or hypervolemia.
  5. A CVP of zero indicates hypovolemia, and a CVP above 15-20 cm H2O may suggest either hypervolemia or poor cardiac contractility.
  6. Turn the stopcock to allow IV solution flow into the patient’s veins when not recording readings.

Charting:

  1. Location of insertion site
  2. Type and size of needle or cannula used for insertion
  3. Time of insertion
  4. Appearance of needle insertion site.

Read more

Things Nurses Must Never Say To Patients

  1. “It’s not that bad.”

    • Downplaying a patient’s pain or discomfort can be dismissive and invalidating. Instead, nurses should acknowledge the patient’s feelings and work together to find ways to manage and alleviate their symptoms.
  2. “You’re just being difficult.”

    • Labeling a patient as difficult can strain the nurse-patient relationship. It’s important to approach each patient with empathy and understand that their behavior may be a result of fear, anxiety, or frustration. Open communication is key to addressing concerns.
  3. “I’m too busy right now.”

    • While nurses often have demanding schedules, expressing busyness without offering assistance or setting a specific time to address the patient’s needs can make them feel neglected. It’s better to communicate a timeframe for when the nurse will be available to help.
  4. “This won’t hurt at all.”

    • Making promises about pain or discomfort that cannot be guaranteed may lead to a loss of trust if the procedure turns out to be painful. Nurses should provide honest information about what to expect and offer support to help manage any discomfort.
  5. “I know exactly how you feel.”

    • Every patient’s experience is unique, and claiming to fully understand their emotions may come across as insincere. Instead, nurses can express empathy, validate the patient’s feelings, and offer support without assuming they know the exact extent of the patient’s emotions.

Read more

Blood Transfusion for low hemoglobin

Introduction

Blood transfusion therapy is a medical intervention that involves the intravenous administration of blood or blood components to a patient. This procedure is commonly employed to restore or improve the patient’s blood volume, enhance oxygen-carrying capacity, or replace specific blood components. Here are key aspects related to blood transfusion therapy:

Principles of Blood Transfusion Therapy

  • Clinical Assessment: Conduct a thorough clinical assessment to determine the patient’s need for blood transfusion. Consider factors such as hemoglobin levels, symptoms, and the underlying cause of anemia or blood loss.
  • Informed Consent: Obtain informed consent from the patient or their legal representative before initiating blood transfusion therapy. Provide information about the purpose, potential risks, and benefits of the procedure.
  • Blood Typing and Cross matching: Perform blood typing to determine the patient’s ABO and RhD blood group. Conduct cross matching to ensure compatibility between donor blood and recipient.
  • Compatibility Testing: Ensure compatibility not only for ABO and RhD but also for other blood group antigens to prevent transfusion reactions.
  • Pre-Transfusion Testing: Screen donated blood for infectious diseases, including HIV, hepatitis, and syphilis. Verify that the blood is free from bacterial contamination.
  • Appropriate Blood Component Selection: Choose the specific blood component based on the patient’s clinical condition. Red blood cells are used for anemia, platelets for clotting disorders, and plasma for coagulation factor deficiencies.
  • Administration Protocol: Follow a standardized protocol for the administration of blood transfusions. Use dedicated intravenous lines and infusion sets for blood products to prevent contamination.
  • Continuous Monitoring: Monitor vital signs (blood pressure, heart rate, respiratory rate, and temperature) during the entire transfusion process. Watch for signs of adverse reactions, including fever, chills, rash, or respiratory distress.
  • Rate of Transfusion: Control the rate of blood transfusion to prevent overload and reduce the risk of transfusion reactions. Adjust the rate based on the patient’s tolerance and clinical condition.
  • Documentation: Maintain accurate and complete documentation of the blood transfusion, including patient details, blood components administered, and any adverse reactions. Record vital signs and monitoring observations at specified intervals.
  • Transfusion Reactions Management: Be prepared to manage transfusion reactions promptly if they occur. Treatment may involve stopping the transfusion, providing supportive care, and addressing specific symptoms.
  • Post-Transfusion Assessment: Assess the patient post-transfusion to determine the effectiveness of the intervention. Monitor for improvements in hemoglobin levels and clinical symptoms.
  • Alternatives and Individualized Care: Consider alternatives to blood transfusion when appropriate, such as erythropoietin or iron supplementation. Individualize care based on the patient’s specific needs and clinical condition.
  • Patient Education: Educate patients about the importance of blood transfusion, potential risks, and expected benefits. Address any concerns or questions the patient may have.

Advantages of Blood Transfusion Therapy:

  • Restoration of Blood Volume: Blood transfusion helps restore and maintain adequate blood volume, particularly in cases of hemorrhage, trauma, or surgery.
  • Improved Oxygen-Carrying Capacity: Transfusing red blood cells increases the oxygen-carrying capacity of the blood, addressing conditions such as anemia or low hemoglobin levels.
  • Treatment of Coagulation Disorders: Blood transfusions provide clotting factors and platelets, essential for treating coagulation disorders or conditions associated with bleeding.
  • Support for Bone Marrow Disorders: Patients with bone marrow disorders, such as leukemia or aplastic anemia, may benefit from blood transfusions to support blood cell production.
  • Rapid Reversal of Symptoms: Blood transfusion can rapidly alleviate symptoms associated with anemia, such as fatigue, weakness, and shortness of breath.
  • Emergency Situations: In emergency situations, blood transfusion is a life-saving intervention to address acute blood loss and stabilize the patient’s condition.
  • Treatment of Hypovolemic Shock: Blood transfusion is crucial in treating hypovolemic shock, a condition characterized by a severe decrease in blood volume.
  • Cancer Treatment Support: Patients undergoing cancer treatments, such as chemotherapy, may require blood transfusions to manage treatment-related side effects.
  • Management of Chronic Conditions: Individuals with chronic conditions causing persistent anemia or blood disorders may benefit from regular blood transfusions to improve their quality of life.
  • Prevention of Organ Damage: Maintaining adequate blood volume and oxygen delivery helps prevent organ damage associated with inadequate perfusion.
  • Correction of Clotting Factor Deficiencies: Blood transfusions are essential for patients with clotting factor deficiencies, such as hemophilia, to prevent or manage bleeding episodes.
  • Support for Surgical Procedures: Prior to and during certain surgical procedures, blood transfusions ensure that patients have sufficient blood volume and oxygenation.
  • Treatment of Neonatal Conditions: Neonates with conditions such as hemolytic disease may require blood transfusions to address severe anemia and prevent complications.
  • Increased Hemoglobin Levels: Blood transfusions effectively increase hemoglobin levels in the blood, improving the oxygen-carrying capacity and overall well-being of the patient.
  • Temporary Supportive Measure: In some cases, blood transfusion serves as a temporary measure while underlying conditions are addressed through other medical interventions.
  • Management of Acute Blood Loss: Blood transfusion is a critical component in managing acute blood loss due to accidents, surgeries, or other traumatic events.
  • Prevention of Organ Failure: Ensuring adequate blood supply through transfusions helps prevent organ failure due to inadequate oxygenation and perfusion.
  • Enhanced Wound Healing: Improved oxygen delivery and clotting factors provided by blood transfusions contribute to enhanced wound healing.

The main blood components:

Red Blood Cells (RBCs):

  • Function: Carry oxygen from the lungs to the rest of the body and transport carbon dioxide back to the lungs for exhalation.
  • Composition: Primarily contains hemoglobin, a protein that binds to oxygen.

White Blood Cells (WBCs):

  • Function: Play a crucial role in the immune system by defending the body against infections and foreign invaders.
  • Types: Neutrophils, lymphocytes, monocytes, eosinophils, and basophils.

Platelets:

  • Function: Essential for blood clotting and wound healing. They help prevent excessive bleeding by forming blood clots.
  • Composition: Small cell fragments involved in the coagulation process.

Plasma:

  • Function: Transports nutrients, hormones, and waste products throughout the body. Also plays a role in maintaining blood pressure and electrolyte balance.
  • Composition: A yellowish fluid that consists of water, electrolytes, proteins (albumin, globulins, fibrinogen), hormones, and waste products.

Plasma Proteins:

  • Albumin: Maintains oncotic pressure, contributing to the regulation of fluid balance between blood and tissues.
  • Globulins: Involved in immune responses and transport various substances in the blood.

Fibrinogen: Essential for blood clot formation.

Cryoprecipitate:

  • Function: Contains concentrated clotting factors, particularly fibrinogen, and is used to treat bleeding disorders.
  • Composition: Derived from fresh frozen plasma (FFP).

Factor VIII and Factor IX Concentrates:

  • Function: Essential clotting factors for individuals with hemophilia A (Factor VIII deficiency) or hemophilia B (Factor IX deficiency).

Packed Red Blood Cells (PRBCs):

  • Function: Used to restore or maintain adequate oxygen-carrying capacity in individuals with anemia or significant blood loss.
  • Composition: Red blood cells separated from plasma and other components.

Fresh Frozen Plasma (FFP):

  • Function: Provides clotting factors, albumin, and other plasma proteins to treat conditions such as coagulopathies.
  • Composition: Plasma that has been frozen and contains all clotting factors.

Whole Blood:

  • Function: Used in specific situations where multiple blood components are needed simultaneously.
  • Composition: A combination of red blood cells, white blood cells, platelets, and plasma.

Objectives of Blood Transfusion Therapy:

Enhance Circulating Blood Volume:

  • Objective: Increase the overall volume of circulating blood, particularly in situations such as post-surgery, trauma, or hemorrhage, to improve perfusion and maintain vital organ function.

Boost Red Blood Cell (RBC) Count and Sustain Hemoglobin Levels:

  • Objective: Elevate the number of red blood cells (RBCs) and sustain adequate hemoglobin levels, especially in individuals with severe anemia, to optimize oxygen-carrying capacity and address symptoms associated with low hemoglobin.

Provide Targeted Cellular Component Replacement:

  • Objective: Offer specific cellular components, such as clotting factors, platelets, and albumin, as replacement therapy. This targeted approach aims to address deficiencies or imbalances in these components, ensuring effective hemostasis, clot formation, and maintenance of plasma oncotic pressure.

Nursing Interventions for Blood Transfusion:

Verify Doctor’s Order:

  • Objective: Confirm the physician’s prescription. Inform the client and provide a clear explanation of the purpose and process of the blood transfusion.

Check for Cross-Matching and Typing:

  • Objective: Ensure compatibility by verifying cross-matching and blood typing results to prevent transfusion reactions.

Obtain and Record Baseline Vital Signs:

  • Objective: Establish baseline vital signs to monitor the client’s response during the transfusion.

Practice Strict Asepsis:

  • Objective: Adhere to rigorous aseptic techniques to minimize the risk of infection during the blood transfusion procedure.

Two-Nurse Verification:

  • Objective: Prior to administration, two licensed nurses must independently verify the blood product label, checking for serial number, blood component, blood type, Rh factor, expiration date, and screening test results for blood-borne diseases.

Warm Blood at Room Temperature:

  • Objective: Prevent chills in the client by warming the blood to room temperature before transfusion.

Proper Client Identification:

  • Objective: Ensure accurate patient identification. Two nurses should independently confirm the client’s identity before initiating the transfusion.

Use Needle Gauge 18 to 19:

  • Objective: Facilitate easy blood flow by using a needle gauge between 18 and 19.

Micron Mesh Filter Blood Transfusion Set:

  • Objective: Utilize a blood transfusion set with a special micron mesh filter to prevent the administration of blood clots and particles.

Start Infusion Slowly and Remain at Bedside:

  • Objective: Initiate the infusion at a rate of 10 drops per minute. Stay at the bedside for the first 15 to 30 minutes as adverse reactions typically occur during this time.

Monitor Vital Signs:

  • Objective: Continuously monitor vital signs. Any alterations, such as an increase in temperature or respiratory rate, may indicate an adverse reaction.

Avoid Mixing Medications with Transfusion:

  • Objective: Prevent adverse effects by refraining from mixing medications with the blood transfusion. Do not introduce medications into the blood transfusion, and avoid using blood transfusion lines for IV push of medications.

Administer 0.9% NaCl Before, During, or After Transfusion:

  • Objective: Use normal saline for pre-transfusion, during, or post-transfusion to avoid hemolysis. Never administer IV fluids with dextrose, as it can cause hemolysis.

Follow Transfusion Duration Guidelines:

  • Objective: Administer whole blood or packed red blood cells over 4 hours. For plasma, platelets, and cryoprecipitate, transfuse quickly within 20 minutes, as clotting factors may be easily destroyed.

Observe for Complications and Notify Physician:

  • Objective: Monitor for potential complications and promptly notify the physician if any issues or adverse reactions arise during the blood transfusion.

Complications of Blood Transfusion

Allergic Reaction:

  • Cause: Sensitivity to donor plasma proteins.

Assessment: Flushing, Rash, hives, Pruritus, Laryngeal edema and difficulty breathing.

Febrile Non-Hemolytic Reaction:

Cause: Hypersensitivity to donor white cells, platelets, or plasma proteins.

Assessment: Sudden chills and fever, Flushing, Headache and Anxiety.

Septic Reaction:

Cause: Transfusion of blood or components contaminated with bacteria.

Assessment: Rapid onset of chills, Vomiting, Marked hypotension and High fever

Circulatory Overload:

Cause: Administration of blood volume at a rate exceeding circulatory capacity.

Assessment: Rise in venous pressure, Dyspnea Crackles or rales, Distended neck veins ,Cough and Elevated blood pressure

Hemolytic Reaction:

Cause: Infusion of incompatible blood products.

Assessment: Low back pain (initial sign due to kidney inflammatory response), Chills, Feeling of fullness, Tachycardia, Flushing, Tachypnea, Hypotension, Bleeding, Vascular collapse and Acute renal failure

Assessment Findings of Transfusion Complications:

Hemolytic Transfusion Reaction:

  • Clinical Manifestations: Fever, Chills, Low back pain, Flank pain, Headache, Nausea, Flushing, Tachycardia, Tachypnea, Hypotension and Hemoglobinuria (cola-colored urine)

Delayed Hemolytic Reaction:

  • Clinical Signs and Laboratory Findings: Fever, Mild jaundice, Gradual fall of hemoglobin and Positive Coombs’ test.

Febrile Non-Hemolytic Reaction:

  • Clinical Manifestations: Temperature rise during or shortly after transfusion, Chills, Headache, Flushing and  Anxiety,

Septic Reaction:

  • Clinical Manifestations: Rapid onset of high fever and chills, Vomiting, Diarrhea and Marked hypotension

Allergic Reactions:

  • Clinical Manifestations: Hives, Generalized pruritus and Wheezing or anaphylaxis (rarely)

Circulatory Overload:

  • Clinical Manifestations: Dyspnea, Cough, Rales, Jugular vein distention
  • Infectious Disease Transmission: Manifestations may develop rapidly or insidiously, depending on the disease. Graft-Versus-Host Disease (GVH):
  • Characteristics: Skin changes (e.g., erythema, ulcerations, scaling), Edema, Hair loss and Hemolytic anemia

10 Nursing Diagnoses:

Hyperthermia

Hypothermia

High Risk for Infection

High Risk for Injury

Pain

Ineffective Breathing Pattern

Decreased Cardiac Output

Fluid Volume Deficit

Fluid Volume Excess

Impaired Gas Exchange

Prevention of Transfusion Reaction:

Meticulously verify patient identification, blood product, and labeling. Inspect the blood product for abnormalities before administration. Begin transfusion slowly (1 to 2 mL/min) and observe closely, especially during the first 15 minutes.

Transfuse blood within 4 hours and change blood tubing every 4 hours. Prevent infectious disease transmission through careful donor screening. Ensure irradiation of blood products containing viable WBCs to prevent GVH disease. Prevent hypothermia by warming the blood unit to 37°C before transfusion.

Remove leukocytes and platelet aggregates with a micro aggregate filter in the blood line. Detection and Intervention for Transfusion Reaction: Stop the transfusion immediately and notify the physician. Disconnect the transfusion set, keeping the IV line open with 0.9% saline.

Send blood bag and tubing to the blood bank for repeat typing and culture. Draw another blood sample for plasma hemoglobin, culture, and retyping. Collect a urine sample for hemoglobin determination. Intervene appropriately based on the specific reaction observed.

Nursing Interventions If Reaction Occurs:

  • Stop the transfusion.
  • Start an IV line with 0.9% NaCl.
  • Place the client in Fowler’s position if experiencing shortness of breath and administer O2 therapy.
  • Remain with the client, observing signs and symptoms, and monitoring vital signs every 5 minutes.
  • Notify the physician immediately.
  • Prepare to administer emergency drugs per physician’s order or protocol.
  • Obtain a urine specimen for hemoglobin determination.
  • Save blood container, tubing, label, and transfusion record for laboratory analysis.

Nursing Evaluation:

  • The patient maintains a normal breathing pattern.
  • The patient demonstrates adequate cardiac output.
  • The patient reports minimal or no discomfort.
  • The patient maintains good fluid balance.
  • The patient remains norm thermic.
  • The patient remains free of infection.
  • The patient maintains good skin integrity, with no lesions or pruritus.
  • The patient maintains or returns to normal electrolyte and blood chemistry values.

Read more

How long does an IV take? Tips & Techniques on IV Insertion

Introduction Mastering the skill of intravenous (IV) insertion is essential for nurses, and continuous practice coupled with confidence is key to success. While it may be considered a basic nursing skill, it can be challenging to master without sufficient experience. Successful practitioners often become adept through consistent practice and hands-on experiences in the field. Here … Read more

Subfertility

Introduction

Subfertility, also known as sub fecundity, refers to a condition where a couple experiences difficulty in achieving conception despite regular unprotected sexual intercourse for a considerable period, usually defined as one year. Unlike infertility, which implies a complete inability to conceive, subfertility suggests a delay or reduced likelihood of achieving pregnancy. Several factors contribute to subfertility, and its management often involves a comprehensive assessment and targeted interventions.

Subfertility, also referred to as sub fecundity, is a condition characterized by difficulties in achieving conception despite regular, unprotected sexual intercourse for an extended period, typically defined as one year. Unlike infertility, which implies a complete inability to conceive, subfertility suggests a delay or reduced likelihood of achieving pregnancy. Both male and female factors can contribute to subfertility, encompassing issues such as irregular ovulation, hormonal imbalances, structural abnormalities, sperm disorders, and age-related declines in fertility. The management of subfertility involves a comprehensive diagnostic evaluation to identify the underlying causes, followed by targeted interventions such as hormonal treatments, assisted reproductive technologies (ART) like in vitro fertilization (IVF), intrauterine insemination (IUI), lifestyle modifications, and, in some cases, surgical procedures. The goal is to address specific factors contributing to subfertility and enhance the chances of successful conception and a healthy pregnancy.

Subfertility Factors in Males

Male subfertility refers to conditions where a man experiences difficulties in contributing to conception, leading to challenges in achieving pregnancy with a female partner. Various factors can contribute to male subfertility, affecting sperm production, quality, or delivery. Here are common factors associated with male subfertility:

  • Low Sperm Count (Oligospermia): Low sperm count, defined as having fewer than 15 million sperm per milliliter of semen, can reduce the likelihood of fertilizing an egg. Oligospermia is a common contributor to male subfertility.
  • Poor Sperm Motility (Asthenospermia): Sperm motility refers to the ability of sperm to move effectively. Poor sperm motility, known as asthenospermia, can impede the sperm’s ability to reach and fertilize an egg.
  • Abnormal Sperm Morphology (Teratospermia): The shape and structure of sperm, known as sperm morphology, play a crucial role in fertility. Abnormalities in sperm morphology, termed teratospermia, can impact the sperm’s ability to penetrate the egg.
  • Erectile Dysfunction: Conditions that affect a man’s ability to achieve or maintain an erection, such as erectile dysfunction, can hinder successful intercourse and contribute to subfertility.
  • Varicocele: A varicocele is the enlargement of veins within the scrotum. It can lead to increased testicular temperature, which may negatively impact sperm production and quality.
  • Hormonal Imbalances: Hormonal imbalances, including deficiencies in testosterone or imbalances in hormones like FSH (follicle-stimulating hormone) and LH (luteinizing hormone), can affect sperm production and maturation.
  • Genetic Factors: Genetic conditions, such as Klinefelter syndrome, can result in abnormal development of the testicles and impact fertility.
  • Obstruction of Reproductive Tract: Blockages or obstructions in the reproductive tract, such as the vas deferens, can prevent the normal flow of sperm during ejaculation.
  • Infections: Infections of the reproductive organs, such as epididymitis or sexually transmitted infections, can affect sperm production and function.
  • Environmental Factors: Exposure to environmental factors like excessive heat, radiation, toxins, or certain medications can have adverse effects on sperm production and quality.
  • Lifestyle Factors: Lifestyle choices, including smoking, excessive alcohol consumption, drug use, and obesity, can contribute to male subfertility.

Management of male subfertility involves a comprehensive evaluation by a healthcare professional, typically a urologist or reproductive endocrinologist. Treatment options may include addressing underlying medical conditions, lifestyle modifications, assisted reproductive technologies (ART), or surgical interventions, depending on the specific factors identified. Additionally, counseling and support may be provided to address the emotional aspects of male subfertility.

Subfertility Factors in Females

Female subfertility refers to conditions where a woman experiences difficulties in conceiving or carrying a pregnancy to term. Various factors can contribute to female subfertility, affecting different aspects of the reproductive process. Here are common factors associated with female subfertility:

  • Ovulatory Disorders: Irregular or absent ovulation, a condition known as anovulation, can significantly impact fertility. Disorders such as polycystic ovary syndrome (PCOS) can contribute to ovulatory issues. Genetic abnormalities, like hypogonadism or Turner’s syndrome, can result in the absence of ovaries, leading to an inability to produce egg cells. Hormonal imbalances, such as hypothyroidism, disrupt the intricate communication between the ovaries, hypothalamus, and pituitary gland, preventing the ovaries from generating egg cells.
  • A woman’s overall nutrition, weight, and exercise routine also play a crucial role in ovulation. Elevated blood glucose levels, often associated with dietary factors such as easily digestible carbohydrates, excessive protein, and saturated fats, can disturb the production of follicle-stimulating hormone (FSH) and luteinizing hormone (LH), ultimately causing ovulation failure.
  • The types of food a woman consumes have a direct impact on her fertility. Diets rich in easily digestible carbohydrates and excessive protein, as well as those high in saturated fats, are associated with decreased fertility. Stress is another significant factor influencing anovulation. Stress interferes with the secretion of gonadotropin-releasing hormone (GnRH) and lowers the production of LH and FSH, disrupting the normal ovulatory process.
  • Polycystic ovary syndrome (PCOS) stands out as the most common cause of anovulation in women. In this condition, the ovaries produce excess testosterone, leading to a reduction in the production of FSH and LH. Consequently, women with PCOS often experience infrequent ovulation, sometimes only a few times throughout the year.
  • Age-Related Decline in Fertility: As women age, the quantity and quality of their eggs decline, leading to a natural decrease in fertility. Advanced maternal age is associated with a higher risk of subfertility and pregnancy complications.
  • Uterine Abnormalities: Structural abnormalities in the uterus, such as uterine fibroids, polyps, or congenital malformations, can interfere with implantation and the ability to sustain a pregnancy.
  • A rare condition impacting a woman’s fertility involves the presence of tumors in the uterus, which can potentially obstruct the implantation site for the embryo. Another contributing factor to subfertility is endometriosis, where particles of the uterine endometrium regurgitate and proliferate, and creating obstacles for the embryo during implantation.
  • Insufficient secretion of estrogen and progesterone from the ovaries leads to inadequate formation of the endometrium, causing interference in the growth of the embryo. This hormonal imbalance can further contribute to difficulties in achieving successful implantation and subsequent pregnancy.
  • Tubal Factors: Blockages or damage to the fallopian tubes can impede the journey of the egg from the ovary to the uterus, hindering fertilization.
  • Endometriosis: Endometriosis is a condition where tissue similar to the lining of the uterus grows outside the uterus. It can cause pelvic pain and interfere with fertility by affecting the function of reproductive organs.
  • Pelvic Inflammatory Disease (PID): Infections, particularly untreated or recurrent pelvic inflammatory disease, can lead to scarring and damage to the reproductive organs, affecting fertility.
  • Polycystic Ovary Syndrome (PCOS): PCOS is a hormonal disorder characterized by irregular ovulation and the presence of multiple small cysts on the ovaries. It can lead to subfertility due to irregular menstrual cycles.
  • Hormonal Imbalances: Imbalances in hormones such as follicle-stimulating hormone (FSH), luteinizing hormone (LH), and thyroid hormones can affect ovarian function and menstrual regularity.
  • Luteal Phase Defect: A shortened or inadequate luteal phase, the second half of the menstrual cycle, can impact the implantation of the fertilized egg.
  • Unexplained Infertility: In some cases, despite thorough evaluation, the cause of subfertility remains unexplained. This is known as unexplained infertility and may require a personalized approach to treatment.
  • Weight and Body Mass Index (BMI): Both underweight and overweight conditions can impact fertility. Extreme changes in weight, such as excessive exercise or drastic weight loss, can disrupt menstrual cycles.
  • Psychological Factors: Stress, anxiety, and other psychological factors can influence reproductive health and may contribute to subfertility.

Management of female subfertility involves a comprehensive assessment by a healthcare professional, typically a reproductive endocrinologist or gynecologist. Treatment options may include lifestyle modifications, hormonal therapies, assisted reproductive technologies (ART) such as in vitro fertilization (IVF), or surgical interventions, depending on the identified factors. Additionally, emotional support and counseling may be integral components of the overall management plan.

Subfertility Assessment

Assessment in the context of healthcare, particularly fertility and reproductive health, involves a systematic and comprehensive evaluation of various factors to understand an individual’s or a couple’s overall health and potential barriers to fertility. The assessment process encompasses both medical and personal aspects to provide a holistic understanding of the individual’s reproductive health. Here are key components of the assessment:

  • Medical History: Gathering detailed information about the individual’s medical history, including any pre-existing conditions, surgical history, medications, and past reproductive experiences.
  • Menstrual History: Understanding the regularity of menstrual cycles, any irregularities, and associated symptoms. This helps in assessing ovulatory function.
  • Sexual History: Exploring the frequency and timing of sexual intercourse, any difficulties or concerns, and the use of contraception methods.
  • Lifestyle Factors: Assessing lifestyle factors that may impact fertility, including diet, exercise, substance use, and exposure to environmental toxins.
  • Genetic and Family History: Examining the individual’s genetic background and any family history of reproductive or genetic conditions that could influence fertility.
  • Physical Examination: Conducting a physical examination to evaluate reproductive organs, identify any abnormalities, and assess overall health.
  • Hormonal Evaluation: Conducting hormonal tests to assess levels of reproductive hormones, such as follicle-stimulating hormone (FSH), luteinizing hormone (LH), estradiol, progesterone, and thyroid hormones.
  • Ovulatory Assessment: Determining ovulatory function through methods such as basal body temperature charting, ovulation predictor kits, or monitoring hormonal changes.
  • Semen Analysis: For male partners, performing a semen analysis to evaluate sperm count, motility, and morphology.
  • Imaging Studies: Utilizing imaging studies, such as pelvic ultrasounds or hysterosalpingography, to assess the structure and condition of reproductive organs.
  • Diagnostic Procedures: Conducting diagnostic procedures like laparoscopy or hysteroscopy if further investigation of the reproductive organs is needed.
  • Psychosocial Assessment: Considering the psychological and emotional aspects of fertility, including stressors, coping mechanisms, and the impact of fertility challenges on mental health.
  • Counseling and Support: Providing counseling and support to address emotional well-being, coping strategies, and informed decision-making regarding fertility treatments. The assessment process is individualized, and the findings help healthcare professionals tailor a personalized treatment plan to address specific factors influencing fertility. The goal is to identify and address any barriers to conception while considering the physical, emotional, and social aspects of the individual or couple seeking fertility support.

The diagnosis

The diagnosis in the context of fertility and reproductive health involves the identification and determination of factors contributing to difficulties in conception or maintaining a pregnancy. A thorough diagnostic process is crucial to understanding the specific challenges an individual or couple may be facing. Here are key elements of the diagnostic phase:

  • Medical and Reproductive History: A detailed review of medical and reproductive histories helps identify any pre-existing conditions, past reproductive experiences, and potential risk factors.
  • Physical Examinations: Physical examinations, including pelvic exams for women and evaluations of reproductive organs, help identify any anatomical abnormalities or conditions that may affect fertility.
  • Hormonal Assessments: Hormonal tests, such as measuring levels of FSH, LH, estradiol, progesterone, and thyroid hormones, provide insights into the functioning of the endocrine system and reproductive hormones.
  • Ovulatory Assessment: Methods like basal body temperature charting, ovulation predictor kits, and hormonal monitoring assist in assessing ovulatory function. Among women, the most cost-effective fertility test involves monitoring and recording the Basal Body Temperature (BBT). The woman is directed to measure and record her BBT daily for a duration of four months. BBT is determined by taking the woman’s temperature before she rises in the morning and engages in any activities.
  • The daily temperature recordings should be accompanied by notes on any conditions that may influence the fluctuation of her temperature. During ovulation, there is a slight dip in temperature followed by a rise, though the increase should not exceed the normal temperature level. This elevated temperature persists for nearly 10 days, encompassing the 3 to 4 days preceding the onset of the next menstrual flow. If the observed temperature rise does not endure for the anticipated duration, a defect in the luteal phase is identified through this method.
  • Semen Analysis: For male partners, semen analysis evaluates sperm count, motility, and morphology to assess sperm health and function. Following a period of 2 to 4 days of sexual abstinence, the male is required to ejaculate via masturbation into a clean and dry specimen cup. The examination of the specimen takes a minimum of 1 hour, during which the sperm are counted.
  • The standard benchmark for a normal sperm count in each ejaculation is 20 million spermatozoa per milliliter of seminal fluid. To account for the continuous and cyclic process of spermatogenesis, the analysis is recommended to be repeated after a span of 2 to 3 months. Spermatogenesis is an ongoing process, and the newly produced sperm take approximately 30 to 90 days to reach maturity. Repeating the analysis after this period allows for an updated assessment of sperm quantity and quality.
  • Imaging Studies: Imaging studies, such as pelvic ultrasounds, hysterosalpingography, or sonohysterography, help visualize reproductive organs and identify structural abnormalities.
  • Genetic Testing: Genetic testing may be recommended to identify any hereditary conditions or genetic factors that could impact fertility.
  • Diagnostic Procedures: In some cases, diagnostic procedures like laparoscopy or hysteroscopy may be performed to directly visualize and assess the condition of reproductive organs.
  • Endometrial Biopsy: An endometrial biopsy may be conducted to evaluate the lining of the uterus for any abnormalities that could affect implantation.
  • Infectious Disease Screening: Screening for sexually transmitted infections and other infectious diseases is essential to identify and treat any underlying infections that may affect fertility.
  • Psychosocial Assessment: A psychosocial assessment may be included to understand the emotional well-being of individuals or couples, as psychological factors can impact fertility.

Tubal patency

Sonohysterography is a diagnostic imaging test utilized to assess the patency of the fallopian tubes, focusing specifically on the uterus. This ultrasound procedure involves filling the uterus with a sterile saline solution, followed by the insertion of a vaginal transducer to examine the uterine structure. The minimally invasive nature of this test allows it to be performed at any point during the menstrual cycle.

Another diagnostic test for evaluating the fallopian tubes is hysterosalpingography. This procedure involves the use of a radiopaque contrast medium to inspect the fallopian tubes. It is typically conducted post-menstruation to prevent the regurgitation of menstrual debris into the tubes.

It’s important to note that contraindications to hysterosalpingography include infections in the vagina, cervix, and uterus. These conditions may interfere with the procedure and compromise its accuracy.

Based on the findings from these diagnostic measures, healthcare professionals can establish a definitive diagnosis, identifying the specific factors contributing to fertility challenges. The diagnosis serves as the foundation for developing a targeted and personalized treatment plan to address the identified issues and enhance the chances of successful conception and pregnancy.

Subfertility  Interventions

Implementation, in the context of fertility and reproductive health, refers to the practical application of strategies and interventions based on the findings from assessments and diagnoses. It involves executing the recommended treatment plan to address identified factors influencing fertility. Here are key aspects of implementation in fertility care:

  • Medical Treatments: Administering medical interventions such as hormonal therapies to regulate ovulation, manage hormonal imbalances, or address specific reproductive conditions. One therapeutic approach for addressing ovulation disturbances involves the administration of Gonadotropin-Releasing Hormone (GnRH). Additionally, Clomiphene citrate is employed to stimulate ovulation, while the administration of human menopausal gonadotropins is another method used to promote the growth of ovarian follicles.
  • Assisted Reproductive Technologies (ART): Implementing ART procedures like in vitro fertilization (IVF), intrauterine insemination (IUI), or other assisted methods to enhance the chances of conception.
  • Lifestyle Modifications: Guiding individuals or couples through lifestyle changes, including dietary adjustments, exercise routines, and stress management, to improve overall reproductive health.
  • Surgical Interventions: Conducting surgical procedures to address anatomical abnormalities, remove obstructions, or treat conditions impacting fertility. In contemporary practice, intrauterine insemination is widely employed as it holds a high likelihood of achieving a viable pregnancy. Surgical interventions are also utilized to address fertility challenges, including the removal of tumors that hinder fertility, such as myomectomy for the excision of myomas. Procedures like diathermy or steroid administration can be undertaken to correct tubal insufficiency resulting from inflammation. Additionally, laparoscopy or laser surgery may be considered for the removal of peritoneal adhesions or nodules.
  • Counseling and Support Services: Providing counseling services to address emotional aspects, alleviate stress, and support individuals or couples throughout the fertility journey.
  • Ovulation Induction: Implementing protocols to induce and regulate ovulation, especially in cases of ovulatory disorders.
  • Genetic Counseling: Offering genetic counseling services when hereditary factors are identified, providing information and guidance regarding potential genetic risks.
  • Monitoring and Follow-Up: Regularly monitoring the progress of interventions through follow-up appointments, hormonal assessments, and imaging studies to adjust the treatment plan as needed.
  • Educational Programs: Offering educational programs to empower individuals or couples with information about reproductive health, fertility awareness, and family planning.
  • Support Groups: Facilitating support groups to create a supportive community for individuals or couples experiencing fertility challenges, allowing them to share experiences and coping strategies.
  • Fertility Preservation: Implementing fertility preservation measures, such as egg or sperm freezing, for individuals facing medical treatments that may impact fertility.
  • Risk Reduction Strategies: Implementing strategies to reduce risks associated with fertility treatments, including multiple pregnancies and complications.
  • Continued Evaluation: Continuously evaluating the effectiveness of implemented interventions and making adjustments to the treatment plan based on ongoing assessments.

Therapeutic Insemination

Therapeutic Insemination, also known as Artificial Insemination, involves the deliberate introduction of sperm into the reproductive tract to facilitate conception. There are various methods of therapeutic insemination, each tailored to specific reproductive needs:

  • Intracervical Insemination: In this method, sperm is introduced into the cervix, optimizing the chances of fertilization.
  • Intrauterine Insemination: This technique involves the direct instillation of sperm into the uterus, providing a more targeted approach to conception.
  • Therapeutic Insemination by Husband: Utilizing the husband’s sperm, this method involves introducing the sperm into the reproductive tract of the wife, enhancing the likelihood of fertilization.
  • Therapeutic Donor Insemination: Using sperm from a donor, this approach involves introducing donor sperm into the woman’s reproductive tract to achieve conception.

Therapeutic insemination is commonly chosen by couples facing challenges related to low sperm count, sperm motility issues, or reproductive factors affecting fertility in women. Prior to the procedure, the woman typically determines her ovulation day through methods such as Basal Body Temperature (BBT) tracking, cervical mucus observations, or ovulation test kits.

Once the ovulation day is identified, the insemination is scheduled for the day after. During the procedure, sperm is introduced into the cervix using a specialized device resembling a cervical cap, or it may be instilled directly into the uterus. These methods aim to optimize the chances of sperm meeting the egg, increasing the likelihood of successful fertilization and conception.

Implementation in fertility care is a dynamic and personalized process, tailored to address the unique needs and challenges of each individual or couple. The goal is to optimize the chances of achieving a healthy conception and pregnancy while considering the physical, emotional, and social dimensions of fertility.

In Vitro Fertilization (IVF)

In the process of In Vitro Fertilization (IVF), one or more oocytes are retrieved from the woman and are fertilized by sperm in a laboratory setting, outside the woman’s body. This procedure is often chosen by individuals or couples facing challenges such as low sperm count in males or abnormalities in the fallopian tubes in females.

To prepare for IVF, the woman is administered an ovulation-stimulating agent. The development of ovarian follicles is closely monitored by daily ultrasound examinations, typically commencing on the 10th day of the menstrual cycle. Upon the maturation of a follicle, human chorionic gonadotropin (hCG) is injected, inducing ovulation within a window of 39 to 42 hours.

Following ovulation, the oocytes are aspirated, and then they are mixed and incubated with sperm. The first cell division occurs approximately 40 hours after fertilization, marking a critical stage in the early development of the embryo. The carefully orchestrated steps of IVF aim to optimize the chances of successful fertilization and subsequent implantation, increasing the likelihood of a successful pregnancy.

Read more

Pregnancy Induced Hypertension

Introduction

Certain complications of pregnancy arise specifically during gestation, while others may preexist but impact the maternal health during pregnancy. These complications act as impediments to a healthy pregnancy, requiring healthcare professionals to navigate them skillfully for the well-being of both the mother and the unborn child. Pregnancy-induced hypertension (PIH), also known as gestational hypertension or pregnancy-related high blood pressure, is a condition that demands vigilant monitoring and expert nursing care.

This article aims to furnish nursing professionals with a comprehensive guide, offering insights into the understanding, identification, and management of pregnancy-induced hypertension. By exploring the pathophysiology, risk factors, and clinical manifestations of PIH, our goal is to empower nurses with the knowledge and skills necessary to deliver optimal care to mothers grappling with this challenge.

Pregnancy-induced hypertension

Pregnancy-induced hypertension (PIH), also known as gestational hypertension, is characterized by vasospasms occurring in both small and large arteries during pregnancy. This condition, occurring in approximately 5 to 8 percent of all pregnancies, manifests as high blood pressure and brings about an increase in the resistance of blood vessels. Consequently, there is a risk of compromised blood flow in various organ systems of the expectant mother, including the liver, kidneys, brain, uterus, and placenta.

Initially termed toxaemia, this condition was once thought to involve the production of a toxin by the woman in response to the foreign protein of the developing fetus. Researchers theorized that this toxin led to the typical symptoms associated with PIH. However, it’s noteworthy that no such toxin has been identified in connection with pregnancy-induced hypertension.

Pathophysiology of pregnancy-induced hypertension

The pathophysiology of pregnancy-induced hypertension (PIH) involves intricate changes in vascular dynamics during pregnancy. While the exact cause remains unclear, the development of PIH is attributed to factors such as vasospasms, which lead to sudden constrictions in both small and large arteries, resulting in increased resistance to blood flow. This heightened vascular resistance contributes to elevated blood pressure, placing additional strain on the cardiovascular system. Endothelial dysfunction, characterized by an imbalance in vasodilators and vasoconstrictors, further exacerbates vascular constriction.

The uterine arteries supplying blood to the placenta are particularly susceptible to these vasospasms, potentially causing placental insufficiency and compromising fetal oxygen and nutrient supply. PIH also impacts various organ systems in the mother, including the liver, kidneys, and brain, leading to potential complications such as impaired organ function. While precise triggers are not fully elucidated, identified risk factors include primigravida, multiple gestations, maternal age extremes, obesity, and a history of hypertension.

Understanding the pathophysiology of PIH is paramount for healthcare professionals to effectively monitor, manage, and mitigate associated risks during pregnancy, ensuring the well-being of both the mother and the developing fetus. Early detection and intervention play pivotal roles in optimizing outcomes for pregnant individuals with PIH.

Classification of pregnancy-induced hypertension

The classification of pregnancy-induced hypertension (PIH) involves categorizing the condition based on the severity of the associated blood pressure elevations and the presence of additional complications. The classifications commonly used are:

  • Gestational Hypertension: This classification refers to elevated blood pressure that occurs after 20 weeks of gestation without the presence of significant proteinuria (excessive protein in the urine). It is often a precursor to more severe forms of PIH and requires close monitoring to assess the risk of progression.
  • Preeclampsia: Preeclampsia is characterized by elevated blood pressure occurring after 20 weeks of pregnancy, accompanied by significant proteinuria. In addition to hypertension and proteinuria, preeclampsia can involve complications such as edema, organ dysfunction (particularly affecting the liver and kidneys), and a risk of adverse outcomes for both the mother and the fetus.
  • Eclampsia: Eclampsia represents the most severe form of PIH and is characterized by the occurrence of seizures (convulsions) in a pregnant woman with preeclampsia. It poses serious risks to both maternal and fetal health and demands immediate medical attention and intervention.
  • Chronic Hypertension with Superimposed Preeclampsia: Some individuals enter pregnancy with pre-existing chronic hypertension. If they develop preeclampsia on top of their existing hypertensive condition, it is termed chronic hypertension with superimposed preeclampsia. This classification acknowledges the challenge of managing individuals with pre-existing hypertension who may be at an increased risk of developing preeclampsia during pregnancy.

These classifications assist healthcare professionals in determining the appropriate level of monitoring, intervention, and management for pregnant individuals with varying degrees of hypertension. Regular assessments of blood pressure, urine protein levels, and organ function are essential components of classifying and managing PIH to ensure the best possible outcomes for both mother and baby.

Risk factors

Several risk factors contribute to the development of pregnancy-induced hypertension (PIH), highlighting the need for careful monitoring and intervention for individuals with heightened susceptibility. Common risk factors include:

  • First-time Pregnancy (Primigravida): Women experiencing their first pregnancy are at an increased risk of developing PIH compared to those who have had previous pregnancies.
  • Multiple Gestations: The presence of twins, triplets, or higher-order multiple pregnancies elevates the risk of PIH due to increased demands on the circulatory system.
  • Maternal Age: Both younger women (under 20 years old) and older women (over 40 years old) face an elevated risk of developing PIH during pregnancy.
  • Obesity: Excess body weight, specifically a body mass index (BMI) above the normal range, is associated with an increased risk of developing PIH.
  • History of Hypertension: Individuals with a pre-existing history of chronic hypertension are at a higher risk of experiencing PIH during pregnancy.
  • Family History: A family history of PIH or hypertensive disorders during pregnancy can contribute to an individual’s susceptibility.
  • Pre-existing Medical Conditions: Certain medical conditions, such as diabetes, renal disease, and autoimmune disorders, may increase the risk of developing PIH.
  • Vascular Disorders: Women with pre-existing vascular disorders or conditions affecting blood vessels may have an elevated risk of developing PIH.
  • Race and Ethnicity: Some studies suggest variations in the prevalence of PIH among different racial and ethnic groups, with African American women facing a higher risk.
  • Interval between Pregnancies: A short interval between pregnancies, defined as less than two years, may increase the risk of PIH.

Understanding these risk factors is crucial for healthcare professionals in identifying individuals who may be more susceptible to pregnancy-induced hypertension. Early identification and proactive management tailored to each patient’s risk profile are essential for mitigating the impact of PIH on maternal and fetal health. Regular prenatal care and monitoring play pivotal roles in addressing these risk factors and promoting positive pregnancy outcomes.

Signs and Symptoms

Pregnancy-induced hypertension (PIH) manifests through various signs and symptoms that necessitate vigilant monitoring and timely intervention. Common indicators include:

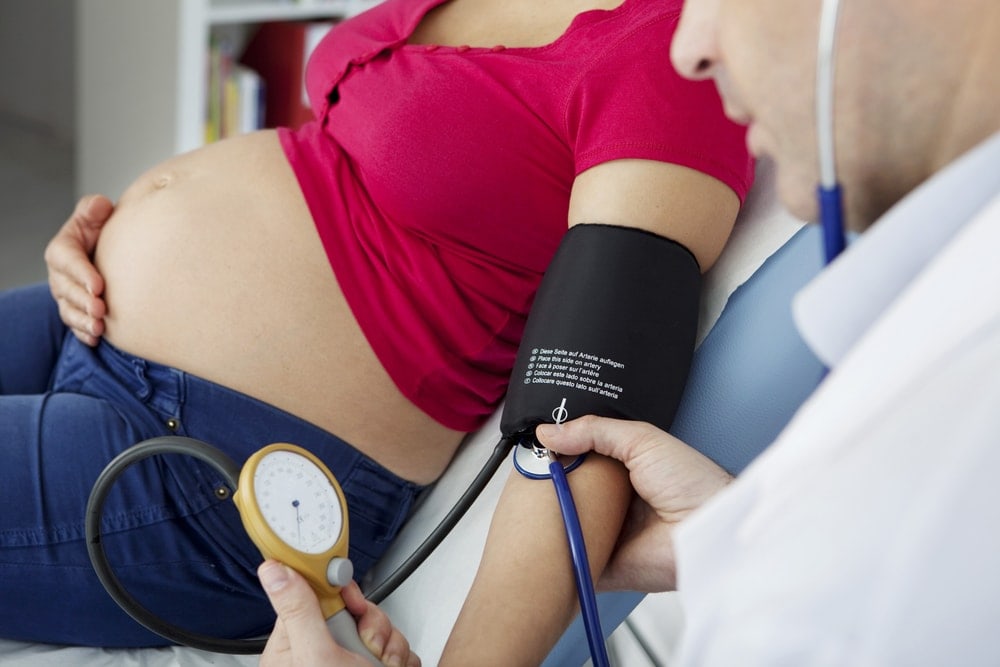
  • Elevated Blood Pressure: One of the primary signs of PIH is an increase in blood pressure, typically occurring after 20 weeks of gestation. Hypertension is diagnosed when blood pressure consistently measures 140/90 mm Hg or higher.
  • Proteinuria: Proteinuria, or the presence of excess protein in the urine, is a hallmark symptom of PIH. It is often identified through routine urine tests during prenatal care.
  • Edema: Swelling, particularly in the hands, face, and legs, may occur in individuals with PIH. Edema is a result of fluid retention and increased vascular permeability.
  • Headaches: Persistent headaches, often described as throbbing or pounding, can be a symptom of PIH. These headaches may not respond well to typical headache remedies.
  • Visual Disturbances: Visual changes, such as blurred vision, light sensitivity (photophobia), or temporary loss of vision, can occur in severe cases and may indicate complications like preeclampsia.
  • Abdominal Pain: Pain or discomfort in the upper abdomen, particularly on the right side, may signal liver involvement, a complication associated with severe PIH.
  • Nausea and Vomiting: Some individuals with PIH may experience persistent nausea and vomiting, which may be indicative of more severe conditions like preeclampsia.
  • Shortness of Breath: Difficulty breathing or shortness of breath can occur due to fluid retention and increased pressure on the lungs.
  • Decreased Urination: Reduced urine output may be a sign of compromised kidney function, a potential consequence of severe PIH.
  • Seizures (Eclampsia): In the most severe cases, PIH can progress to eclampsia, characterized by seizures. This is a medical emergency requiring immediate attention.

It’s crucial for pregnant individuals and healthcare professionals to be vigilant for these signs and symptoms, especially if risk factors for PIH are present. Regular prenatal check-ups, blood pressure monitoring, and urine tests are essential components of early detection and management. Prompt intervention is crucial to prevent complications and ensure the well-being of both the mother and the developing fetus.

Diagnostic tests

Diagnostic tests play a crucial role in identifying and monitoring pregnancy-induced hypertension (PIH), aiding healthcare professionals in timely intervention and management. Key diagnostic tests include:

  • Blood Pressure Measurement: Regular monitoring of blood pressure is fundamental in diagnosing PIH. Elevated blood pressure, defined as consistently measuring 140/90 mm Hg or higher after 20 weeks of gestation, is a primary diagnostic criterion.
  • Urine Tests for Proteinuria: Testing for proteinuria involves analyzing urine samples to detect the presence of excess protein. This helps confirm the diagnosis of PIH, with increased protein levels indicating potential complications.
  • Blood Tests: Comprehensive blood tests may be conducted to assess organ function, including liver and kidney function. Abnormalities in these tests can indicate the severity of PIH and potential organ involvement.
  • Complete Blood Count (CBC): CBC provides information about red blood cell count, white blood cell count, and platelet count. Abnormalities may suggest complications associated with PIH.
  • Liver Function Tests: Evaluating liver enzymes, such as alanine aminotransferase (ALT) and aspartate aminotransferase (AST), helps assess liver function and detect potential complications like HELLP syndrome (Hemolysis, Elevated Liver enzymes, and Low Platelet count).
  • Renal Function Tests: Blood tests, such as serum creatinine and blood urea nitrogen (BUN), help assess kidney function. Abnormal results may indicate impaired renal function, a possible consequence of severe PIH.
  • Non-Stress Test (NST) and Biophysical Profile (BPP): Fetal monitoring through NST and BPP assesses the well-being of the fetus. These tests help determine fetal heart rate patterns and monitor amniotic fluid levels, providing insights into fetal health.
  • Ultrasound Imaging: Ultrasound scans may be performed to assess the placenta, fetal growth, and amniotic fluid levels. Abnormalities may indicate complications associated with PIH.
  • Doppler Ultrasound: Doppler ultrasound measures blood flow in the uterine and umbilical arteries, providing valuable information about placental function and potential restrictions in blood flow.
  • 24-Hour Urine Collection: In cases of suspected severe PIH or preeclampsia, a 24-hour urine collection may be conducted to accurately measure protein excretion over a specified time period.

These diagnostic tests enable healthcare professionals to confirm the diagnosis of PIH, assess the severity of the condition, and identify any associated complications. Regular and thorough monitoring is crucial throughout pregnancy to ensure optimal maternal and fetal health.

Medical management

The medical management of pregnancy-induced hypertension (PIH) is focused on controlling blood pressure, preventing complications, and ensuring the well-being of both the mother and the fetus. The approach to medical management may vary based on the severity of PIH and individual patient factors. Key components of medical management include:

  • Blood Pressure Monitoring: Regular monitoring of blood pressure is essential to track changes and assess the effectiveness of interventions. Individuals with PIH often require more frequent monitoring, and healthcare providers may recommend home blood pressure monitoring for additional oversight.
  • Antihypertensive Medications: Antihypertensive medications may be prescribed to control elevated blood pressure. Common medications include methyldopa, labetalol, and nifedipine. The choice of medication depends on individual patient factors, such as gestational age, severity of hypertension, and potential side effects.
  • Hospitalization: Severe cases of PIH may necessitate hospitalization for closer monitoring and management. This is particularly relevant if there are signs of complications, such as organ dysfunction or fetal distress.
  • Magnesium Sulfate for Seizure Prevention: Magnesium sulfate may be administered to prevent seizures in individuals diagnosed with severe PIH or preeclampsia. This is particularly crucial in cases where there is an increased risk of progression to eclampsia.
  • Corticosteroids: In cases of severe PIH, corticosteroids may be administered to enhance fetal lung maturity if early delivery is anticipated. This is often considered when the pregnancy needs to be terminated preterm to mitigate risks to both the mother and the fetus.
  • Fetal Monitoring: Continuous fetal monitoring, such as non-stress tests (NST) or biophysical profiles (BPP), helps assess fetal well-being. Close monitoring is essential to detect any signs of fetal distress promptly.
  • Delivery Timing: The decision regarding the timing of delivery is a critical aspect of medical management. In cases of severe PIH or complications, the healthcare team may recommend preterm delivery to safeguard the health of both the mother and the fetus.
  • Postpartum Monitoring: Postpartum monitoring is crucial to assess blood pressure levels and ensure the resolution of PIH. Blood pressure management may continue after delivery, and close follow-up care is essential for ongoing evaluation.
  • Fluid Balance: Maintaining optimal fluid balance is important in managing PIH. Healthcare providers carefully monitor fluid intake and output to prevent complications related to fluid retention or dehydration.
  • Patient Education: Patient education is integral to medical management. Individuals with PIH are educated about the importance of regular prenatal visits, medication adherence, signs of complications, and when to seek medical attention.

Medical management of PIH requires a collaborative and individualized approach, with healthcare providers closely monitoring the patient’s condition throughout pregnancy and the postpartum period. Timely interventions and a multidisciplinary approach contribute to optimizing outcomes for both mother and baby.

Surgical management

Surgical management is not typically the first-line approach for pregnancy-induced hypertension (PIH). However, certain complications associated with severe PIH or preeclampsia may necessitate surgical interventions. The decision for surgical management is made on a case-by-case basis, considering the health status of both the mother and the fetus. Some scenarios where surgical interventions may be considered include:

  • Cesarean Section (C-Section): In cases of severe PIH or preeclampsia, where there is a risk to the health of the mother or the fetus, a cesarean section may be recommended. This surgical delivery method allows for a controlled and expedited delivery, reducing the duration of exposure to the potential complications associated with PIH.
  • Induction of Labor: If the mother’s blood pressure is difficult to control or if there are signs of fetal distress, healthcare providers may opt for the induction of labor to initiate childbirth. This is a controlled process that may be initiated with medications or other methods to bring about contractions and promote delivery.
  • Placental Removal: In cases where the placenta is not functioning adequately due to compromised blood flow associated with PIH, surgical removal may be necessary. This can occur during a cesarean section or a postpartum procedure to address complications such as retained placenta.
  • Tubal Ligation: In situations where a woman with severe PIH does not wish to have more children and has completed her family, a tubal ligation may be considered. This is a surgical procedure for permanent sterilization, often performed during a cesarean section or shortly after childbirth.

It is important to note that surgical interventions are reserved for specific circumstances where the benefits outweigh the risks. The decision for surgical management is typically made collaboratively between the patient, obstetrician, and other members of the healthcare team, taking into account the severity of PIH, the gestational age of the fetus, and the overall health status of the mother.

Continuous monitoring and careful consideration of the risks and benefits are crucial in determining the most appropriate course of action. The goal is to ensure the safety and well-being of both the mother and the fetus, addressing any complications associated with severe PIH in a timely and effective manner.

Nursing management

Nursing management plays a critical role in the care of individuals experiencing pregnancy-induced hypertension (PIH). The focus is on monitoring, supporting, and educating the pregnant individual to promote optimal outcomes. Here are key components of nursing management for PIH:

Assessment and Monitoring:

Regular monitoring of vital signs, including blood pressure, is fundamental. Nurses assess for signs and symptoms of PIH, such as proteinuria, edema, and other complications. Continuous fetal monitoring, such as non-stress tests (NST) and biophysical profiles (BPP), helps assess the well-being of the fetus.

Medication Administration:

Nurses administer antihypertensive medications as prescribed, closely monitoring the individual’s response and potential side effects. For severe cases, where magnesium sulfate is indicated for seizure prevention, nurses administer and monitor the infusion carefully.

Fluid and Electrolyte Balance:

Nurses monitor fluid intake and output to maintain optimal fluid balance. This is essential in preventing complications related to fluid retention or dehydration.

Patient Education:

Education is a key aspect of nursing management. Nurses provide information about the importance of prenatal care, medication adherence, signs of complications, and when to seek medical attention. Pregnant individuals are educated on self-monitoring of blood pressure at home if recommended by the healthcare provider.

Emotional Support:

Pregnancy-induced hypertension can be stressful. Nurses provide emotional support, addressing concerns and providing reassurance. Encouraging open communication helps pregnant individuals express their feelings and fears about the condition.

Positioning and Comfort Measures:

Nurses assist in positioning the pregnant individual to maximize comfort and minimize edema. Encouraging rest and providing comfort measures, such as applying cold compresses, can alleviate discomfort associated with edema.

Labor Support:

In cases where induction of labor or cesarean section is necessary, nurses provide support during the labor process. Continuous monitoring of both the mother and the fetus is maintained throughout labor and delivery.

Complication Prevention:

Nurses work proactively to prevent complications by closely monitoring for signs of deterioration in the mother’s condition. Close collaboration with the healthcare team ensures prompt intervention if complications arise.

Postpartum Care:

Nursing care extends into the postpartum period. Blood pressure monitoring continues, and nurses assess for any lingering signs of hypertension or complications. Patient education regarding postpartum recovery, signs of postpartum hypertension, and the importance of follow-up care is provided.

Interdisciplinary Collaboration:

Nurses collaborate with obstetricians, midwives, and other healthcare professionals to ensure comprehensive care. Communication between team members is crucial for providing individualized care based on the severity of PIH and the unique needs of each patient.

Nursing management for pregnancy-induced hypertension requires a holistic approach that addresses both the physical and emotional well-being of the pregnant individual. Regular assessments, vigilant monitoring, and effective communication contribute to optimal outcomes for both the mother and the newborn.

Read more

Placenta Previa Dos and Donts

Introduction Placenta previa is a pregnancy complication where the placenta partially or completely covers the cervix, the opening of the uterus. This condition can cause bleeding during pregnancy and delivery. Placenta previa is typically diagnosed during a routine ultrasound examination. Types of placenta Previa Complete Placenta Previa: Description: In this condition, the placenta fully covers … Read more