Cerumen (ear wax) is a protective, self-cleaning secretion that traps debris, lubricates the external auditory canal, and provides antimicrobial defense. For many, cerumen migrates outward spontaneously. However, cerumen impaction can obstruct the canal, impair hearing, interfere with audiological testing or hearing aids, and precipitate otitis externa.
Ear wax removal suction commonly termed microsuction has become a preferred technique in many clinical settings because it permits direct visualization, precise control, and minimal moisture exposure compared with irrigation. This comprehensive, nurse-written guide outlines when to remove ear wax, how to choose between microsuction and irrigation, step-by-step technique, safety considerations, and patient education, using an educational tone tailored to clinical practice.
Ear Wax Removal Suction (Microsuction): Indications, Procedure, Safety, and Nursing Best Practices
Cerumen 101: Function, Types, and Risk Factors for Impaction
- Physiological role
- Traps particulate matter, repels water, lubricates skin, and contains antimicrobial peptides.
- Phenotypes
- Wet vs dry cerumen types are genetically determined (ABCC11 variant) and influence appearance but not necessarily management.
- Risk factors for impaction
- Narrow or tortuous ear canals; exostoses/osteomas
- Use of hearing aids or earplugs
- Cotton swab use (drives wax deeper)
- Dermatologic conditions (eczema, psoriasis), older age (drier cerumen and decreased migration)
- Prior ear surgery, recurrent otitis externa
- Viscous cerumen and heavy hair in the canal
Indications for Ear Wax Removal
- Symptomatic cerumen impaction: hearing loss, fullness, tinnitus, pruritus, cough (Arnold’s nerve reflex), otalgia
- Obstructed visualization of the tympanic membrane when exam is clinically necessary (e.g., otitis media assessment)
- Pre-procedure clearance: tympanometry, audiometry, hearing aid fitting, canal impressions
- Recurrent otitis externa linked to debris accumulation
- Foreign body adjunct management when wax obscures removal
Red Flags and When Not to Proceed in Primary Care
- Acute otalgia with fever or purulent discharge (suspected acute otitis media with perforation)
- Sudden sensorineural hearing loss (urgent ENT referral)
- Severe vertigo or nystagmus at baseline
- Known or suspected tympanic membrane perforation or tympanostomy tube in situ without specialist guidance
- Postoperative ear (mastoid cavity, reconstructed tympanic membrane) without specialist protocol
- Suspected cholesteatoma: foul discharge, retraction pocket, granulation refer to ENT
- Vegetable foreign bodies: irrigation contraindicated (swelling risk); consider suction or specialist removal
- Anticoagulation with high bleeding risk or bleeding diathesis take increased care with instrumentation; consider specialist setting
Ear Wax Removal Methods: Overview
- Microsuction (suction-assisted removal under visualization)
- Advantages: dry technique, real-time visualization, avoids middle ear exposure to water, suitable with perforation if specialist-trained
- Disadvantages: noise discomfort; requires training, equipment, and steady hand
- Irrigation (low-pressure water instillation)
- Advantages: widely available; effective for soft wax
- Disadvantages: introduces moisture; contraindicated with perforation; potential for otitis externa or dizziness
- Manual curettage/forceps under direct visualization
- Advantages: precise removal of discrete fragments
- Disadvantages: requires excellent visualization; risk of canal abrasion
Why Choose Microsuction for Ear Wax Removal?
- Direct visualization decreases risk of canal trauma and allows selective targeting of wax
- Dry technique avoids maceration of skin and reduces risk of post-procedure otitis externa
- Appropriate for patients with a history of ear surgery or perforation when performed by trained clinicians under magnification
- Often faster and better tolerated than repeated irrigation in patients with dense, adherent cerumen
- Facilitates concurrent assessment for canal pathology, retraction pockets, or middle ear findings
Contraindications and Precautions for Microsuction
- Relative contraindications
- Uncooperative patient (young child without immobilization, severe anxiety)
- Acute external otitis with severe edema (postpone until inflammation controlled)
- Known hyperacusis or sound sensitivity (use lowest practical suction; brief passes)
- Precautions
- Anticoagulated state: gentle technique; avoid canal abrasion
- Dermatologic fragility (eczema/psoriasis): minimize friction; consider pre-softening with cerumenolytics
- Anatomical challenges: stenotic canal, exostoses use smallest tips and increased magnification
Pre-Procedure Assessment and Preparation
- History
- Prior ear surgery, perforation, recurrent infections, vertigo, hearing aid use, anticoagulant/antiplatelet use, diabetes
- Examination
- Otoscopy (preferably with a headlight or microscope): note wax consistency (soft, flaky, hard, adherent), canal anatomy, skin integrity, and tympanic membrane visibility
- Patient-centered planning
- Explain purpose, steps, expected sounds (suction noise), possible sensations (pressure, brief dizziness), and potential risks (minor abrasion, transient tinnitus)
- Obtain informed consent
- Pre-softening (as needed)
- Consider 2–3 days of topical cerumenolytic (e.g., mineral oil, olive oil, hydrogen peroxide-based cerumenolytics) for hard, impacted wax; avoid with suspected perforation unless using sterile oil under specialist guidance
- Positioning and environment
- Seated or reclined; stabilize head; ensure adequate lighting and magnification (binocular microscope or loupe/headlight)
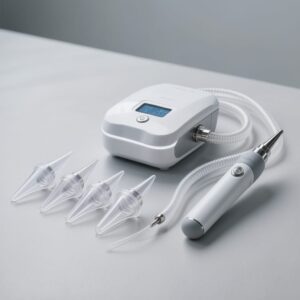
Equipment for Ear Wax Removal Suction (Microsuction)
- Visualization: otoscope with specula, headlight, or surgical microscope (preferred)
- Suction system: medical-grade suction with adjustable negative pressure
- Tips/cannulae: Frazier suction tips (sizes 3–7), Zoellner tip, fine suction olive tip; sterile single-use preferred
- Cerumen management tools: Jobson Horne probe/loop, alligator forceps, curettes for adjunctive use
- PPE and infection control: gloves, eye protection, mask; surface disinfectants
- Ancillary items: cotton balls, gauze, cerumenolytic drops, sterile saline for limited canal rinse (not irrigation), waste container
- Emergency supplies: isopropyl alcohol or acetic acid drops (to dry canal if damp), topical antibiotic/steroid drops if canal abrasion occurs per protocol.
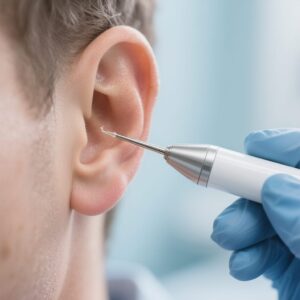
Step-by-Step Microsuction Technique
- Brief Rehearsal and Time-Out
- Confirm patient, ear side, consent, and no contraindications; establish a stop signal for discomfort.
- Positioning and Visualization
- Seat comfortably with head supported; use highest-quality visualization available. Choose appropriate speculum size to gently open the canal.
- Canal Inspection
- Inspect the canal to assess wax distribution. Identify an accessible edge or central plug; anticipate need for loop or forceps adjunct.
- Suction Setup
- Set suction to the lowest effective negative pressure. Attach a fine suction tip (start small; size up only as needed).
- Initial Debulking
- Under continuous visualization, introduce the tip just to the surface of the cerumen. Gently contact and lift fragments. Avoid prolonged suction on canal skin; use short, controlled passes with frequent reassessment.
- Fragment Management
- For soft wax: the tip can “kiss” the wax, lifting it off in layers. For hard wax: free an edge with a loop or curette, then reapply suction to mobilize fragments.
- Protect the Canal
- Keep the tip centered; do not scrape canal walls. If the view fogs or debris accumulates, withdraw, clear the tip, and re-enter. Manage hair gently within the canal.
- Tympanic Membrane Safety
- Maintain a safe distance from the tympanic membrane. Never apply suction directly to the membrane. If visibility reduces near the membrane, pause and reorient.
- Completion and Final Inspection
- Once the canal is cleared and the tympanic membrane is visible, inspect for erythema, scratches, retraction, fluid level, or perforation. Document findings.
- Post-Procedure Care
- If abrasion occurred, consider topical antibiotic/steroid drops per protocol to reduce risk of otitis externa. If canal is damp, apply drying drops (e.g., isopropyl alcohol/acetic acid mixture) unless contraindicated.
Infection Prevention and Safety
- Asepsis and PPE for all procedures; hand hygiene before and after
- Single-use, sterile tips or properly sterilized reusable instruments
- Avoid moisture retention in canal; if accidental moisture exposure occurs, dry thoroughly
- Disinfect surfaces and equipment between patients
- Stop immediately for pain, persistent coughing (Arnold’s reflex), vertigo, or bleeding; reassess and manage accordingly
Managing Complications and Troubleshooting
- Canal abrasion or minor bleeding
- Apply gentle pressure with cotton; if needed, prescribe topical antibiotic/steroid drops per protocol and advise water precautions for 3–5 days
- Dizziness or nausea
- Pause; check for cold airflow on the tympanic membrane or rapid pressure changes; resume slowly after symptoms subside
- Persistent cough
- Withdraw momentarily; reduce pressure; consider brief pauses to desensitize reflex
- Unresolved hard, adherent wax
- Initiate a short course of cerumenolytic drops and rebook; avoid aggressive scraping
- Pain
- Stop; reassess for canal trauma or underlying infection; postpone if necessary and treat inflammation first
Ear Irrigation: When, How, and Key Nursing Alerts
While microsuction offers a dry, controlled alternative, irrigation remains common in primary care when the tympanic membrane is intact and there is no active infection. It uses low-pressure, body-temperature fluid to flush softened cerumen from the canal.
Indications and Contraindications for Irrigation
- Indicated for: soft or moderately impacted cerumen in a patient with intact tympanic membrane and no history of ear surgery
- Contraindicated in:
- Known/suspected tympanic membrane perforation or patent tympanostomy tube
- History of mastoid or middle ear surgery without specialist guidance
- Severe otitis externa or cellulitis
- Vegetable foreign bodies (swell on contact with water)
- Recent otologic trauma, acute infection, or fever with ear pain
- Vertigo with unclear etiology
Equipment and Preparation (Irrigation)
- Irrigant warmed to ~37°C (98.6°F) to reduce vertigo
- Irrigation syringe (bulb or large ear syringe) or low-pressure irrigation device with controlled flow
- Emesis basin, waterproof pad, cotton balls, gauze
- Otoscope for pre- and post-procedure exams
- Documentation tools

Stepwise Technique and Rationale (Irrigation)
- Assessment and Consent
- Review history (perforation, infection, surgery); explain purpose, sensations (warmth, fullness), and stop criteria; obtain consent.
- Positioning
- Seat upright or semi-reclined; tilt head toward the affected side; place basin beneath the ear; protect linens with a waterproof pad. This orientation allows gravity-assisted drainage.
- Canal Preparation
- Clean the pinna and meatus to prevent debris from being driven inward; examine canal to confirm intact membrane.
- Straighten the Canal
- For adults: pinna up and back; for infants: down and back—this aligns the canal to optimize flow.
- Irrigation
- Direct a gentle, continuous stream toward the superior–posterior canal wall rather than directly at the tympanic membrane; do not occlude the canal to avoid pressure spikes.
- Use the minimum force required; allow irrigant to flow out freely. Avoid volumes exceeding ~500 mL per session.
- Monitor and Stop Criteria
- Cease immediately for pain, dizziness, or sudden bleeding; reassess and consider alternative management.
- Completion
- Allow fluid to drain fully; place a cotton ball loosely in the meatus; have the patient lie briefly on the affected side to encourage egress; re-examine with otoscope to confirm clearance and assess the tympanic membrane and canal skin.
Nursing Alerts (Irrigation)
- Do not direct flow onto the tympanic membrane
- Use warmed solution; cold fluid can precipitate vertigo
- Forceful instillation risks perforation; low pressure is essential
- Vegetable foreign bodies should not be irrigated
- If a perforation is discovered or suspected during the procedure, stop and consult a prescriber
- Document solution type and volume, output characteristics, tolerance, and findings
Special Populations and Clinical Nuances
- Children
- Reduced cooperation and narrower canals; consider pre-softening, distraction, or referral for specialist removal; immobilization and parental presence help; avoid aggressive instrumentation
- Older adults
- Drier cerumen and thinner canal skin; use gentle technique; consider pre-softening and lower suction settings
- Hearing aid users
- Higher cerumen production and retention; emphasize routine maintenance and periodic professional cleaning; verify device function post-procedure
- Anticoagulated patients
- Increased bleeding risk; favor microsuction with meticulous technique; avoid canal trauma; apply pressure and topical measures if abrasion occurs
- Diabetic or immunocompromised patients
- Elevated risk of otitis externa; prioritize dry technique; use antiseptic or antibiotic drops for canal injury per protocol
- Post-ear surgery or perforation history
- Specialist protocols only; microsuction may be permissible under magnification by trained clinicians; avoid irrigation
- Dermatologic conditions (eczema/psoriasis)
- Gentle handling; consider short course of anti-inflammatory drops if canal dermatitis flares post-procedure
Documentation, Coding, and Follow-Up
- Document
- Indication (symptoms, exam), consent, method used (microsuction/irrigation/manual), solutions and volumes if irrigated, instruments, findings (wax quantity, canal skin condition, tympanic membrane status), complications, patient tolerance, education provided, and follow-up plan
- Coding
- Use appropriate procedural codes per local payer guidance for cerumen removal (e.g., removal under microscopy vs simple removal)
- Follow-up
- Reassess if partial clearance or if pre-softening was initiated with planned second visit
- Refer to ENT for persistent symptoms, suspected middle ear pathology, stenosis, or complex anatomy
Patient Education and Aftercare
- Immediate aftercare
- Mild fullness or transient tinnitus can occur briefly; advise avoiding water in the ear for 24–48 hours if canal abrasion occurred; consider drying drops unless contraindicated
- Recurrence prevention
- Avoid inserting objects (cotton swabs, hairpins) into the canal
- Consider periodic softening drops for those with recurrent impaction (e.g., mineral or olive oil 1–2 times weekly) unless perforation is present
- For hearing aid users, clean devices regularly and schedule ear checks every 6–12 months
- Warning signs
- Return for severe pain, persistent discharge, fever, vertigo, or sustained hearing loss
Quality and Safety Metrics for Ear Wax Removal Services
- First-pass success rate (complete clearance without complications)
- Complication incidence (canal abrasion, infection, perforation, severe vertigo)
- Unplanned returns within 7–14 days
- Patient-reported comfort and satisfaction
- Adherence to infection prevention and device reprocessing standards
- Staff competency verification and continued education
Comparing Microsuction and Irrigation
- Safety
- Microsuction: dry, visual control; lower risk of otitis externa; suitable with perforation under specialist protocol
- Irrigation: effective for soft wax; avoid with perforation; risk of canal maceration
- Tolerance
- Microsuction: noise may be bothersome; typically faster
- Irrigation: sensation of fullness; potential for dizziness if fluid too cold
- Equipment/Skill
- Microsuction: requires suction unit, fine tips, magnification, and training
- Irrigation: simpler equipment; training still required for safe technique
- Use cases
- Microsuction: hard/adherent wax, hearing aid users, high otitis externa risk
- Irrigation: soft to moderate impactions with intact membrane
Common Myths and Evidence-Informed Clarifications
- Myth: Cotton swabs effectively clean ear wax.
- Clarification: Cotton swabs push wax deeper, increasing impaction risk and potential injury.
- Myth: All ear wax must be removed.
- Clarification: Cerumen is protective; removal is indicated when symptomatic or when it obstructs necessary examination or device fitting.
- Myth: Perforated eardrums always preclude ear wax removal.
- Clarification: Irrigation is contraindicated; microsuction can be performed safely in trained hands with visualization.
Frequently Asked Questions (FAQ)
Q1: Is ear wax removal suction (microsuction) safer than irrigation?
Microsuction is a dry, visualized technique that avoids fluid exposure and typically carries a lower risk of post-procedure otitis externa. It is well suited for hard or adherent wax and for patients with higher risk of infection. Irrigation remains safe and effective for soft wax when the tympanic membrane is intact and contraindications are absent.
Q2: Does microsuction hurt?
Most patients tolerate microsuction well. The suction noise can be loud, and brief pressure sensations may occur. Discomfort is a signal to pause and reassess. Canal abrasion should be avoided through gentle, well-visualized technique.
Q3: Can ear wax be removed in the presence of a perforated eardrum?
Irrigation should be avoided with perforation or tympanostomy tubes. Microsuction can be considered by trained clinicians using magnification, with caution to avoid contacting the eardrum.
Q4: What drops help soften ear wax before removal?
Cerumenolytics include sterile mineral or olive oil, hydrogen peroxide–based solutions, or carbamide peroxide. Use depends on anatomy and membrane integrity; avoid non-sterile oils with perforation unless specialist-directed.
Q5: What are warning signs after ear wax removal that warrant re-evaluation?
Severe or worsening pain, persistent discharge, fever, lasting vertigo, or sustained hearing loss should prompt prompt reassessment to exclude infection or injury.
Conclusion
Ear wax removal suction (microsuction) offers a precise, dry, and well-visualized method for managing symptomatic cerumen impaction, particularly when canal skin is fragile, wax is hard, or middle ear conditions preclude irrigation. A structured approach appropriate assessment, clear indications, attention to red flags, meticulous technique, and thoughtful aftercare maximizes success and minimizes complications.
Irrigation remains an important alternative for soft wax when tympanic membrane integrity is confirmed and contraindications are absent. Consistent documentation, infection prevention, and patient education round out safe practice. With training, appropriate equipment, and adherence to evidence-informed protocols, clinical teams can deliver ear wax care that is effective, comfortable, and safe outcomes that are appreciated across nursing and allied health settings.
[…] Read more: Ear Wax Removal Suction […]