Bed-to-chair transfers are fundamental to nursing practice and central to early mobility, fall prevention, and functional recovery. A safe transfer protects the musculoskeletal health of staff, preserves dignity and comfort for the patient, and reduces adverse events such as near-falls, line dislodgement, and pressure injuries. This comprehensive, nurse-written guide details assessment, equipment selection, body mechanics, stepwise techniques, population-specific adaptations, orthostatic hypotension prevention, line management, documentation, and quality measures grounded in safe patient handling and mobility (SPHM) principles.
Moving Patients from Bed to Chair: Safe Transfer Protocols, Ergonomics, and Clinical Best Practices
Note: Follow institutional policy, manufacturer guidance, and interprofessional care plans. Use mechanical lifts when manual transfer is contraindicated or staffing/resources indicate.

Pre-Transfer Assessment: Establish Safety Before Movement
A brief, structured assessment identifies the safest transfer method and the required level of assistance.
Mobility and Strength
- Bed Mobility: ability to roll, bridge hips, scoot to bed edge.
- Sitting Balance: unsupported sitting tolerance; postural control.
- Lower-Extremity Strength: knee extension and dorsiflexion against gravity.
- Weight-Bearing Status: full, partial, toe-touch, or non-weight bearing.
Cognition and Communication
- Orientation and ability to follow one- to two-step commands.
- Impulsivity risk; delirium screening when indicated.
- Language needs and interpreter access.
Physiologic Stability
- Vital signs and symptoms: dizziness, chest pain, dyspnea, fatigue.
- Orthostatic risk: recent bed rest, volume depletion, autonomic dysfunction, antihypertensives, diuretics.
- Pain level; plan pre-emptive analgesia if appropriate.
Precautions and Contraindications
- Postoperative restrictions: hip precautions (anterior/posterior), spinal precautions (log-roll, no bending/twisting/lifting), sternal precautions.
- Devices: casts, external fixators, wound vacs.
- Skin integrity risks and pressure injury staging.
Lines, Drains, and Airways
- IVs/central lines, arterial lines.
- Foley catheters, ostomies, NG tubes, drains (JP, chest tubes).
- Oxygen delivery devices and monitoring leads.
Environment and Setup
- Floor clear of hazards; adequate lighting.
- Chair/wheelchair condition; brakes locked; armrests and footrests managed.
- Staff availability: determine number of assistants and assign roles.
Equipment and Assistive Devices: Choose the Right Tool
Proper selection reduces musculoskeletal strain and optimizes safety.
Transfer Belt (Gait Belt)
- Wide, sturdy belt placed snugly at waist level over clothing.
- Grip from below with palms up; avoid pulling on arms or axillae.
- Contraindications: recent abdominal surgery, feeding tubes, colostomy; consider chest placement if approved.
Slide Board (Transfer Board)
- Bridges the gap from bed to chair for limited weight-bearing or paraplegia.
- Requires good sitting balance or two assistants for stabilization.
- Skin protection: use moisture-wicking barrier to reduce friction and shear.
Friction-Reducing Aids
- Slide sheets, draw sheets, or air-assisted devices for lateral movements and positioning before sitting.
Mechanical Lifts
- Sit-to-Stand Lift: for cooperative patients with some lower-extremity strength who can bear partial weight.
- Full-Body (Hoyer) Lift: for non–weight-bearing or dependent transfers; use appropriate sling size and type (hammock, universal, hygiene).
Wheelchairs and Chairs
- Lock brakes; remove or swing-away leg rests.
- Position parallel at 30–45 degrees to bed on strongest side when feasible.
- Ensure non-skid footwear and supportive cushions as needed.
Bariatric and Specialty Equipment
- Bariatric-rated chairs and slings with correct weight capacity.
- Transfer pivot discs, knee-immobilizers, or custom supports as ordered.
Body Mechanics for Clinicians: Protect the Spine, Use the Legs
Ergonomics prevents avoidable injury.
- Neutral Spine: maintain natural curves; avoid spinal flexion during lift.
- Base of Support: stance shoulder-width apart; one foot slightly ahead.
- Center of Gravity: stay close to the patient; keep elbows near the torso.
- Hip Hinge and Lunge: bend at hips and knees; rise by extending hips and knees, not the back.
- Avoid Twisting: pivot with feet; align shoulders and hips in direction of movement.
- Team Synchrony: use closed-loop communication; count down (“On three—stand”); designate a leader.
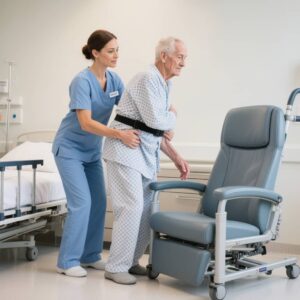
Standard Assisted Pivot: Bed-to-Chair Step-by-Step
This technique suits partially mobile patients who can bear weight and follow directions, with one or two assistants.
- Prepare Space and Equipment
- Clear obstacles; position chair parallel to bed on stronger side.
- Lock bed and chair brakes; adjust bed height to clinician’s mid-thigh for ergonomic assistance.
- Place non-skid footwear; apply transfer belt.
- Pre-Stand Positioning
- Elevate head of bed; assist to roll to side; bring legs over edge.
- Use momentum and a rocking motion to achieve long-sitting, then edge-of-bed sitting.
- Assess sitting balance; allow 1–3 minutes to acclimate and monitor for orthostatic symptoms.
- Foot and Hand Placement
- Patient’s feet shoulder-width apart; ankles aligned under knees.
- Clinician’s knees may block patient’s knees gently if instability is present.
- Instruct patient to push from bed surface or armrest; avoid pulling on clinician.
- Stand on Command
- On a coordinated count, assist to stand using belt control; shift weight anteriorly (“nose over toes” cue).
- Maintain midline alignment; stabilize until balance achieved.
- Pivot and Sit
- Pivot toward chair in small steps; clinician steps in unison.
- Align posterior thighs to chair; reach back for armrests if able.
- Lower in a controlled manner; guide hips to seat; ensure full contact with backrest.
- Finalize Safety
- Center body; position pelvis neutrally; place feet on footrests if wheelchair.
- Reassess for dizziness, pain, or respiratory distress; ensure alarm settings per fall protocol.
Slide Board Transfer: For Limited Weight-Bearing or Paraplegia
- Position chair close; level seat heights; lock brakes.
- Place board under thigh and buttock, bridging to chair; protect skin with towel or slide sheet.
- Stabilize knees and trunk; cue small lateral lifts along the board.
- Remove board once seated; check skin for shear or pressure-related redness.
Sit-to-Stand Lift: For Partial Weight-Bearing With Device Assistance
- Apply appropriate sling or support strap; position feet on platform; secure knees against pad.
- Verify sling attachment points; confirm weight capacity.
- Activate lift to raised standing; pivot device toward chair; lower safely; detach per manufacturer instructions.
Full-Body Lift (Hoyer): For Dependent Transfers
- Select correct sling size; place sling beneath patient using log-roll method while preserving spinal precautions.
- Attach sling to lift spreader bar; perform safety check.
- Elevate slowly; guide to chair; ensure a clear path for legs and footrests.
- Lower into chair; remove sling if policy permits or leave in place if indicated and safe.
Special Populations and Precautions
Post–Total Hip Arthroplasty
- Posterior Approach: avoid hip flexion >90°, adduction past midline, internal rotation; use abduction pillow; elevated seat height and raised toilet seats.
- Anterior Approach: avoid excessive hip extension and external rotation; protect incision.
Spinal Precautions
- Log-roll for bed mobility; maintain neutral spine; avoid bending, twisting, lifting.
- Consider mechanical lift during acute instability.
Hemiparesis/Stroke
- Transfer toward stronger side; place weaker foot slightly ahead to reduce pivot strain.
- Support flaccid arm; protect shoulder subluxation; apply sling if ordered.
Parkinson Disease or Freezing Episodes
- Use rhythmic cues; step-over visual targets; allow ample time; avoid rushing.
Bariatric Care
- Confirm equipment weight ratings; schedule adequate staff; prioritize mechanical lift use.
- Skin protection strategies to minimize shear and pressure.
Amputation
- Protect residual limb; maintain knee extension in below-knee amputation to prevent contracture.
- Use slide board or mechanical lift during early phases.
Cardiorespiratory Compromise
- COPD or bronchitis exacerbation: titrate oxygen per order; avoid excessive oxygen in CO2 retainers; coach pursed-lip breathing; monitor SpO2 and dyspnea.
- Link to respiratory care planning resources (e.g., bronchitis nursing diagnosis care plan) for integrated management.
Managing Lines, Tubes, and Devices During Transfers
- IV Lines: secure with tape or stabilization devices; maintain slack to prevent tugging; keep pumps on poles close to bed/chair.
- Foley Catheter: place bag below bladder level; do not place on floor; secure tubing to thigh; verify flow.
- Chest Tubes: keep drainage system upright and below chest; avoid kinking; confirm suction source if applicable.
- NG/Feeding Tubes: clamp per policy; secure tube to prevent dislodgement; verify placement afterward as indicated.
- Oxygen: ensure portable source filled; verify liter flow; avoid tripping on tubing; confirm pulse oximetry availability if ordered.
- Telemetry/Monitors: keep leads attached; coordinate with monitoring staff to avoid alarms during movement.
Preventing Orthostatic Hypotension and Falls
- Dangling Protocol: sit at edge of bed for 1–3 minutes; observe for lightheadedness, pallor, diaphoresis.
- Egress Test:
- Sit-to-stand with minimal assistance.
- March in place.
- Step-pivot to chair.
- Compression: abdominal binders or compression stockings per provider order to reduce pooling.
- Hydration: assure recent fluid intake if appropriate; review diuretic timing.
- Medications: consider recent antihypertensives, nitrates, or sedatives.
- Post-Event Monitoring: recheck vital signs after transfer for high-risk patients.
Skin Integrity and Pressure Injury Prevention
- Use cushions and wedges to offload bony prominences.
- Reposition at regular intervals; microshifts every 15 minutes in chair for immobile patients.
- Use moisture management and barrier creams for incontinence.
- Avoid shear: use slide sheets and lift, do not drag.
- Chair selection: appropriate seat depth/width and lumbar support reduce sacral pressure.
Infection Prevention and PPE
- Perform hand hygiene before and after contact.
- Apply PPE per precaution type: standard, contact, droplet, airborne.
- Clean and disinfect equipment between patients per policy.
- Avoid resting equipment or catheter bags on bedding or floor.
Interprofessional Collaboration and Delegation
- Physical/Occupational Therapy: evaluation for transfer technique, device selection, and tolerance building.
- Nursing Assistive Personnel: delegated transfers within training scope using established safety plans.
- Respiratory Therapy: oxygen titration and pulmonary hygiene support before/after movement.
- Case Management: equipment procurement for home use; caregiver training coordination.
Documentation: What to Chart After a Bed-to-Chair Transfer
- Transfer type and assistance level (independent, supervision, contact guard, minimal/moderate/maximum assist, 2-person assist, mechanical lift).
- Device(s) used: transfer belt, slide board, sit-to-stand, full-body lift, wheelchair type.
- Precautions followed: hip, spine, sternal.
- Patient tolerance: vital signs, orthostatic symptoms, pain, fatigue, dyspnea.
- Line/tube status: intact, patent, secure; drainage amounts if notable.
- Skin assessment: pre- and post-transfer redness, tears, pressure areas.
- Education provided: safety cues, call light use, non-skid footwear, brake use.
- Communication and escalation: PT/OT looped in, provider notified of intolerance or adverse events.
Sample note:
“Bed-to-chair transfer completed with contact guard assist x1 using transfer belt to wheelchair positioned on left. Hip precautions maintained; chair brakes locked; leg rests removed during pivot. IV and Foley catheter secured with adequate slack; oxygen at 2 L/min maintained. Patient tolerated well; no dizziness; SpO2 remained 94–95%. Skin intact; sacral area protected with cushion. Call light within reach; chair alarm activated.”
Quality and Safety: Metrics That Matter
- Falls and near-miss reports during transfers.
- Staff injury rates related to manual handling.
- Early mobility compliance: time to first out-of-bed post-admission or post-op.
- Pressure injury incidence and device-related skin injury.
- Patient-reported comfort and confidence during transfers.
Troubleshooting Common Challenges
- Sudden Dizziness Mid-Transfer: return to bed or nearest seat immediately; elevate legs; reassess vitals.
- Patient Begins to Slide While Sitting: use belt control at waist to guide descent; do not pull on arms; call for assistance early.
- Resistance or Fear: validate concerns; break task into smaller steps; demonstrate with another staff member when appropriate.
- Small Room/Clutter: reposition furniture before transfer; request assistance for equipment management.
- Equipment Malfunction: stop transfer; secure position; replace device; document and notify biomedical services.
Practical Checklist-Bed-to-Chair Transfer
- Confirm provider orders and weight-bearing status.
- Assess mobility, cognition, vitals, orthostatic risk, pain, and lines.
- Prepare environment: brakes locked, pathway clear, chair positioned, alarms managed.
- Select equipment: belt/board/lift; correct sizes and ratings.
- Apply non-skid footwear; place belt; pre-medicate if needed.
- Sit at edge; dangle; reassess symptoms.
- Stand with coordinated count; pivot; controlled sit.
- Reassess comfort and vitals; secure lines and supports.
- Document details; update mobility plan; communicate with team.
Education for Patients and Care Partners
- Purpose of transfers: mobility, lung expansion, circulation, and skin protection.
- Safety practices: non-skid footwear, brake use, call for assistance, avoidance of sudden movements.
- Device familiarity: transfer belt rationale, lift use to prevent injury, importance of upright positioning after meals.
Policy, Regulation, and SPHM Programs
- OSHA/NIOSH: endorse elimination of manual lifting when feasible and use of mechanical devices to prevent caregiver injury.
- Facility SPHM Policies: algorithms for patient handling, lift utilization thresholds, and staff training requirements.
- Competency Verification: annual skills validation for transfer techniques and device operation.
Case Scenarios: Applying Principles
Post–Hip Arthroplasty Day 1
- Elevated chair with firm seat; abduction pillow; avoid hip flexion >90°.
- Two-person assist with transfer belt; pivot toward non-operative side.
- Monitor for orthostatic hypotension; document tolerance and reinforcement of precautions.
Right Hemiparesis After Stroke
- Transfer toward left (stronger) side; protect flaccid right arm with support.
- Knee block to prevent buckling; contact guard assist; slower pacing.
- Educate on weight shift and scanning for neglect.
COPD Exacerbation on 2 L/min Oxygen
- Pre-oxygenate as ordered; coach pursed-lip breathing; short verbal cues.
- Transfer belt with one assist; monitor SpO2; titrate per protocol if needed.
- Position in chair with upright posture and pillow for arm support to ease WOB.
Bariatric Patient With Deconditioning
- Mechanical full-body lift with bariatric sling; three staff members.
- Skin checks post-transfer; pressure redistribution cushion; timed sitting intervals.
Conclusion
Safe transfers from bed to chair are essential pillars of quality nursing care, promoting early mobility, reducing complications, and supporting recovery goals across settings. A methodical assessment, correct choice of equipment, disciplined body mechanics, and interprofessional coordination ensure safety for both patients and staff. Consistent documentation and adherence to SPHM principles transform a routine task into a high-value intervention that enhances comfort, preserves function, and prevents harm—outcomes that resonate with every healthcare team.
FAQs
Q1: When is a mechanical lift preferred over a manual transfer?
Mechanical lifts are indicated for dependent or non–weight-bearing patients, for bariatric transfers exceeding equipment or staffing capability, when cognitive or behavioral factors preclude safe manual assistance, or when staff injury risk is elevated. Facility algorithms often specify thresholds for sit-to-stand versus full-body lifts.
Q2: What is the difference between a transfer belt and a gait belt?
Both terms are often used interchangeably. A transfer (gait) belt provides a secure handhold at the waist to guide and steady a patient during transfers or short ambulation. Proper fit and placement over clothing are essential; avoid use over fresh abdominal incisions or invasive tubes.
Q3: How can orthostatic hypotension be minimized during transfers?
Implement a dangling protocol, perform an egress test, consider compression garments or abdominal binders per order, review medication timing, ensure recent fluid intake if appropriate, and allow gradual position changes with close monitoring of symptoms and vital signs.
Q4: What steps help prevent falls during a bed-to-chair transfer?
Lock bed and chair brakes, clear clutter, apply non-skid footwear, choose the correct transfer method and assistance level, use a transfer belt or lift, follow a coordinated count, pivot without twisting, and ensure controlled descent with immediate reassessment once seated.
Q5: What elements should be included in transfer documentation?
Record assistance level, devices used, precautions followed, patient tolerance and vital signs, status of lines/tubes, skin assessment, education provided, and communications to other disciplines. Include any adverse symptoms or deviations and associated responses.